Every part of N·PLOT step by step, in the order a show is built: from the recce without a console to the live show with the desk connected. Pick a section on the left or move page by page.
The local N·PLOT server starts (port 3000) and the window connects to it. That server keeps the shows and the patch, listens to the DMX on the network and serves the app to the other devices.
The venue network
The computer and the console on the same IP range, with different IPs (for example, console 10.0.0.1 and computer 10.0.0.2, same mask).
If the computer has Wi-Fi and cable on the same network, keep only the adapter that goes to the console.
The first time, Windows asks whether N·PLOT may use the network: allow it on private networks too, or the DMX won't arrive.
For iPads and phones to join, they must be on the same Wi-Fi and the same subnet as the computer.
Language: Spanish or English, in System Settings → Language. The PDF comes out in the app's language.
02 · Getting started
Signing in and licenses
The sign-in screen has three tabs: Sign In, License Key and Memberships (the last one doesn't show in the iPad and Android apps).
Sign In: type the email you bought with and press Send code. A code arrives by email; type it and you're in. There's no password.
License Key: paste the key you received when you bought.
Try free for 14 days: no card, with every Pro Studio feature.
When the trial or the license ends the app turns read-only: you can open and view your shows, but not edit, save, connect the desk or export until you activate a license.
Offline license: each activation is signed on the device and lasts 30 days without internet; it renews itself when it connects.
My Account
In System Settings, your name (green when the license is valid) opens My Account:
License details, name and profile picture.
Devices: your license's seats and which device uses each; release a seat from here.
Manage subscription (or Invoices and payments in Master Suite): invoices, card and cancellation in the billing portal.
Seats and sessions: a Pro Studio license has 2 seats (for example, computer and iPad) but only one live session at a time. In Team there's one live session per seat. Devices that join through the QR code use their own license, not the computer's trial.
03 · Getting started
Shows
A show (.tshow) is the whole project: planos, backgrounds, fixtures, DMX patch, CCT ranges, shapes, signal, power and rigging.
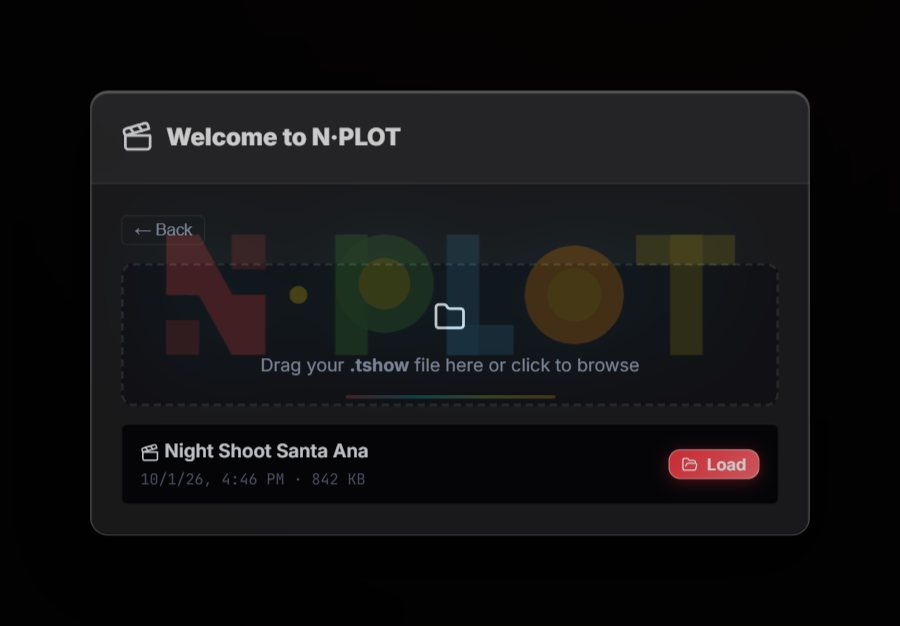
When the app opens it always asks: New Show (starts empty, patch included) or Load Existing Show.
At startup: a new show or one saved on the server.
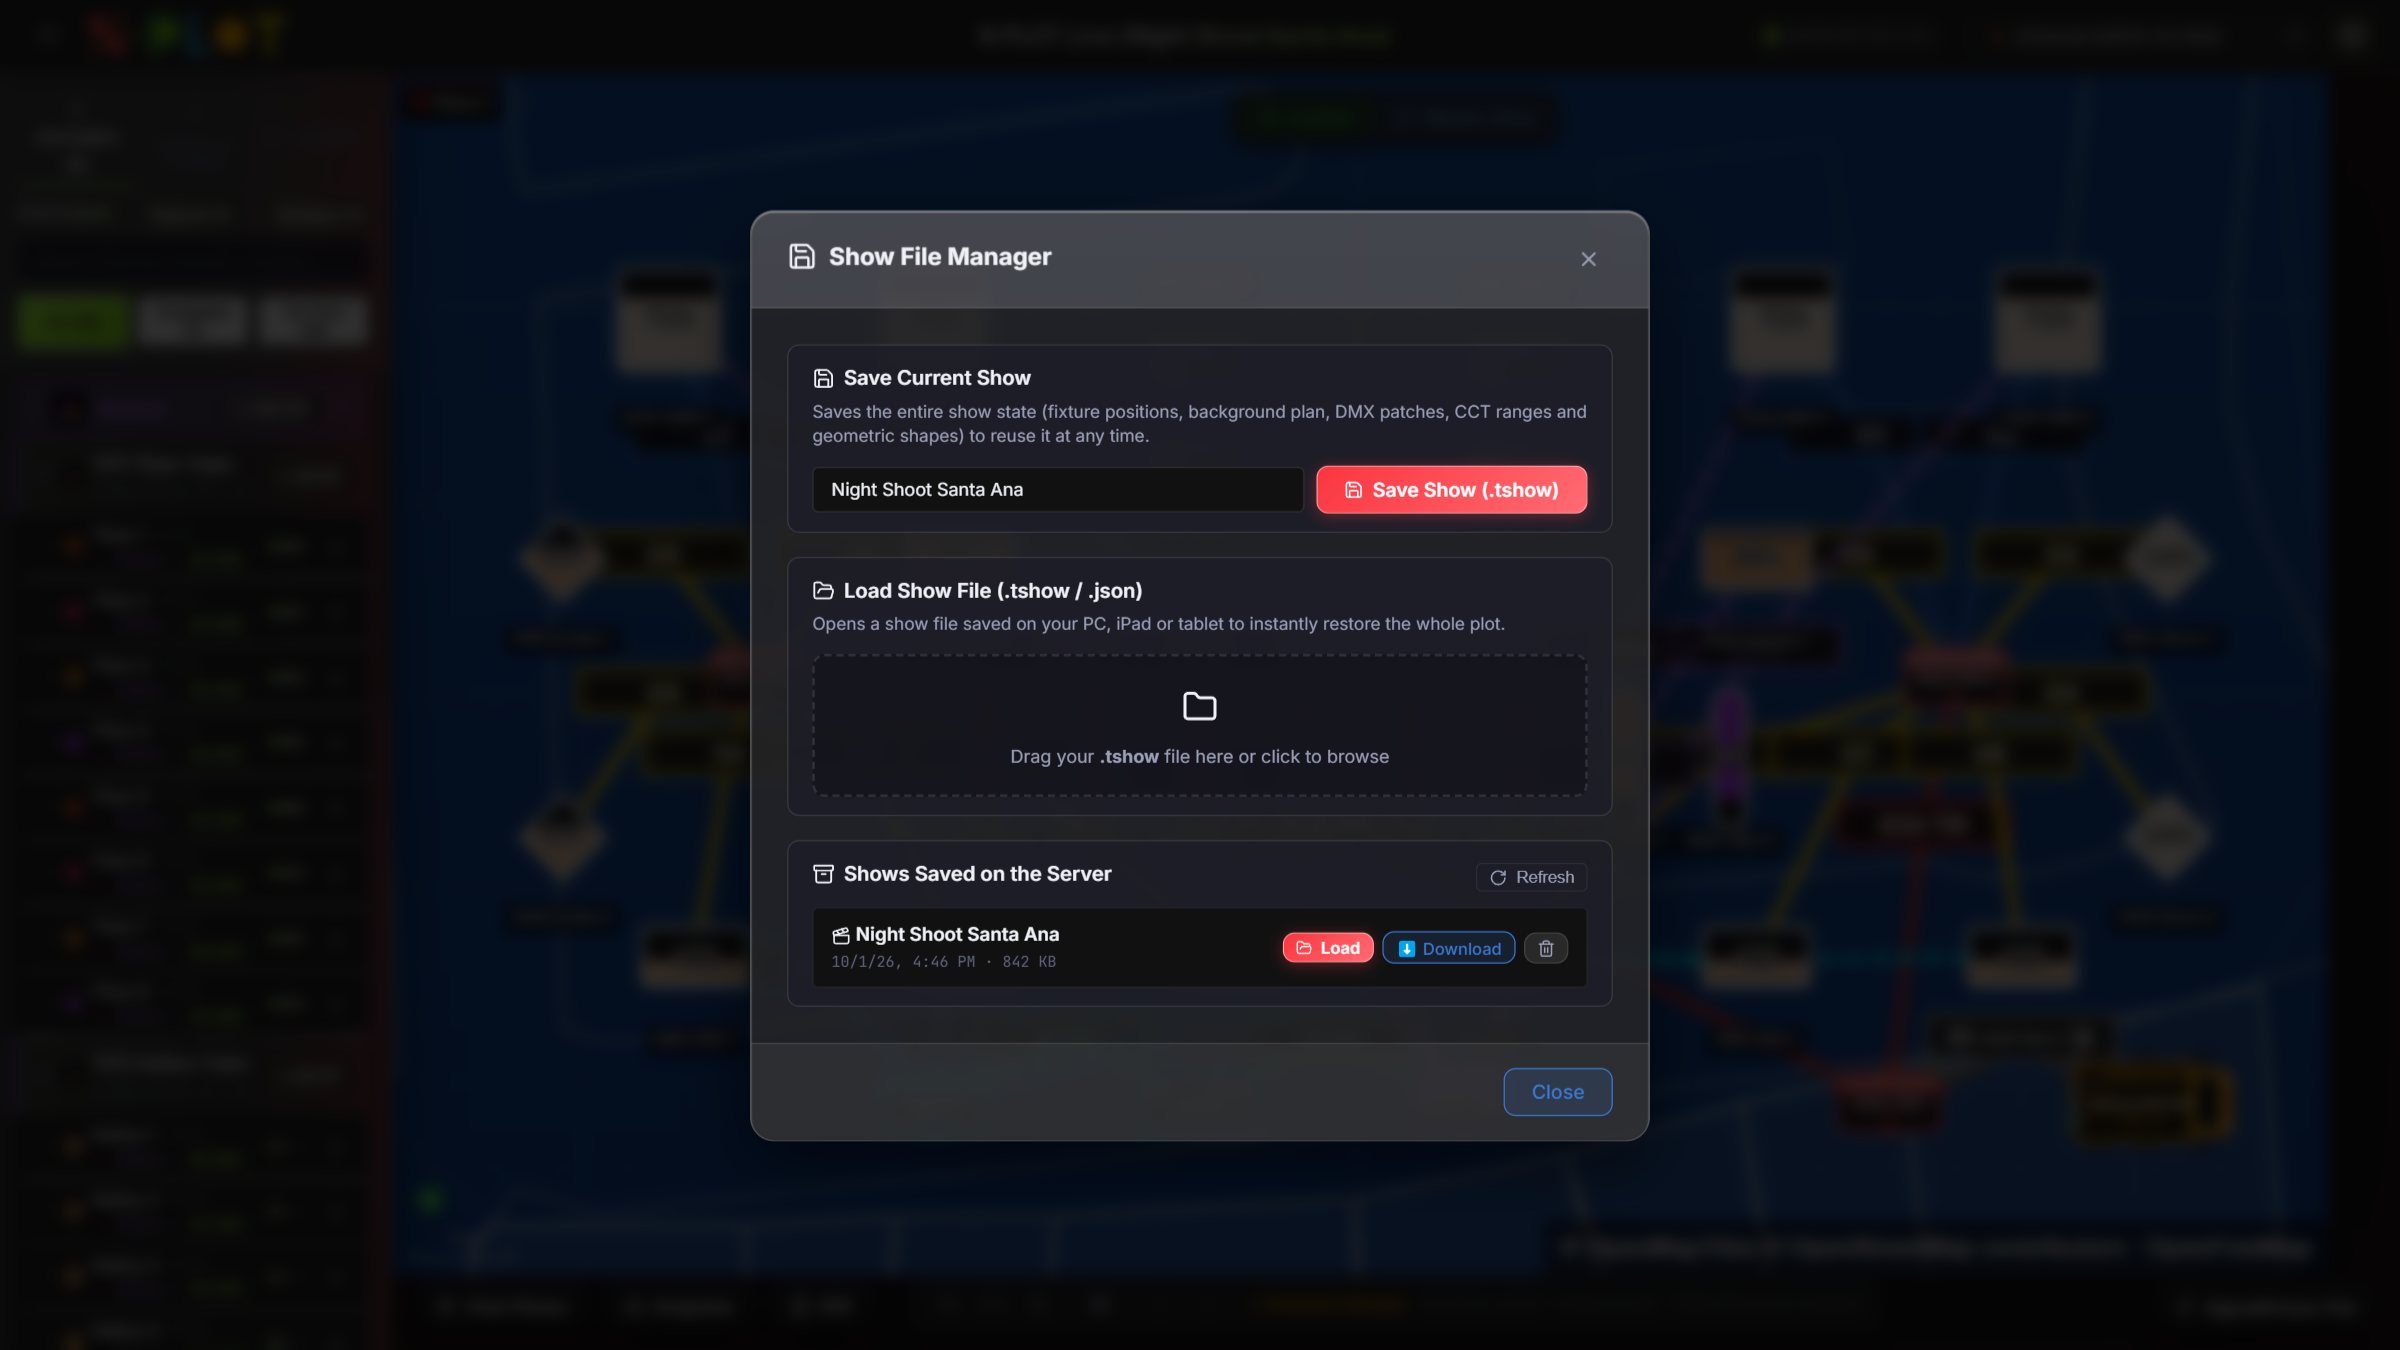
Show manager
The gear in the top bar → System Settings → Show File (.tshow):
Save Current Show: type the name and press Save Show (.tshow). It's saved on the local server.
Load Show File: drop a .tshow or .json on the upload area.
Shows Saved on the Server: each show with Load, Download and Delete.
Show manager: save, load from a file and shows on the server.
Start from scratch mid-session: System Settings → New Project / Start From Scratch. It empties the plan, Signal & Power and the patch.
While you work the plan's state is kept on the device; the «Unsaved changes» notice in the bottom bar reminds you the show isn't saved as a file. Save a .tshow before a big change or before importing a patch.
Joining another computer's show: when you connect to another machine's server (see Teamwork and iPad), you aren't asked for a show: you take that server's patch and its master's plan.
04 · Getting started
Planos and tabs
Each show can hold several planos (plans), one per tab above the canvas: stage, outdoor area, auditorium, one venue per tour day…
Press + next to the last tab to create a plano.
Press a tab to switch to that plano.
Double-click a tab to rename it; the tab's × deletes it.
Each plano keeps its own: background, scale, placed fixtures, shapes and text, Signal & Power and rigging. The DMX patch belongs to the show: it's the same on every plano, and each plano places the fixtures it needs.
Undo works per plano: switching tabs starts the history again.
Copying between planos: select, Ctrl + C, switch tab, Ctrl + V (see Export and share).
05 · The plan
Plan background
The background is the reference everything is placed on: a venue plan, a technical drawing turned into neon, or a map of the site.
Image or PDF
In Edit Mode press Background.
Drop a JPG, PNG or PDF (or pick the file). In a multi-page PDF, pick the page.
Adjust its size with Size and leave with Esc.
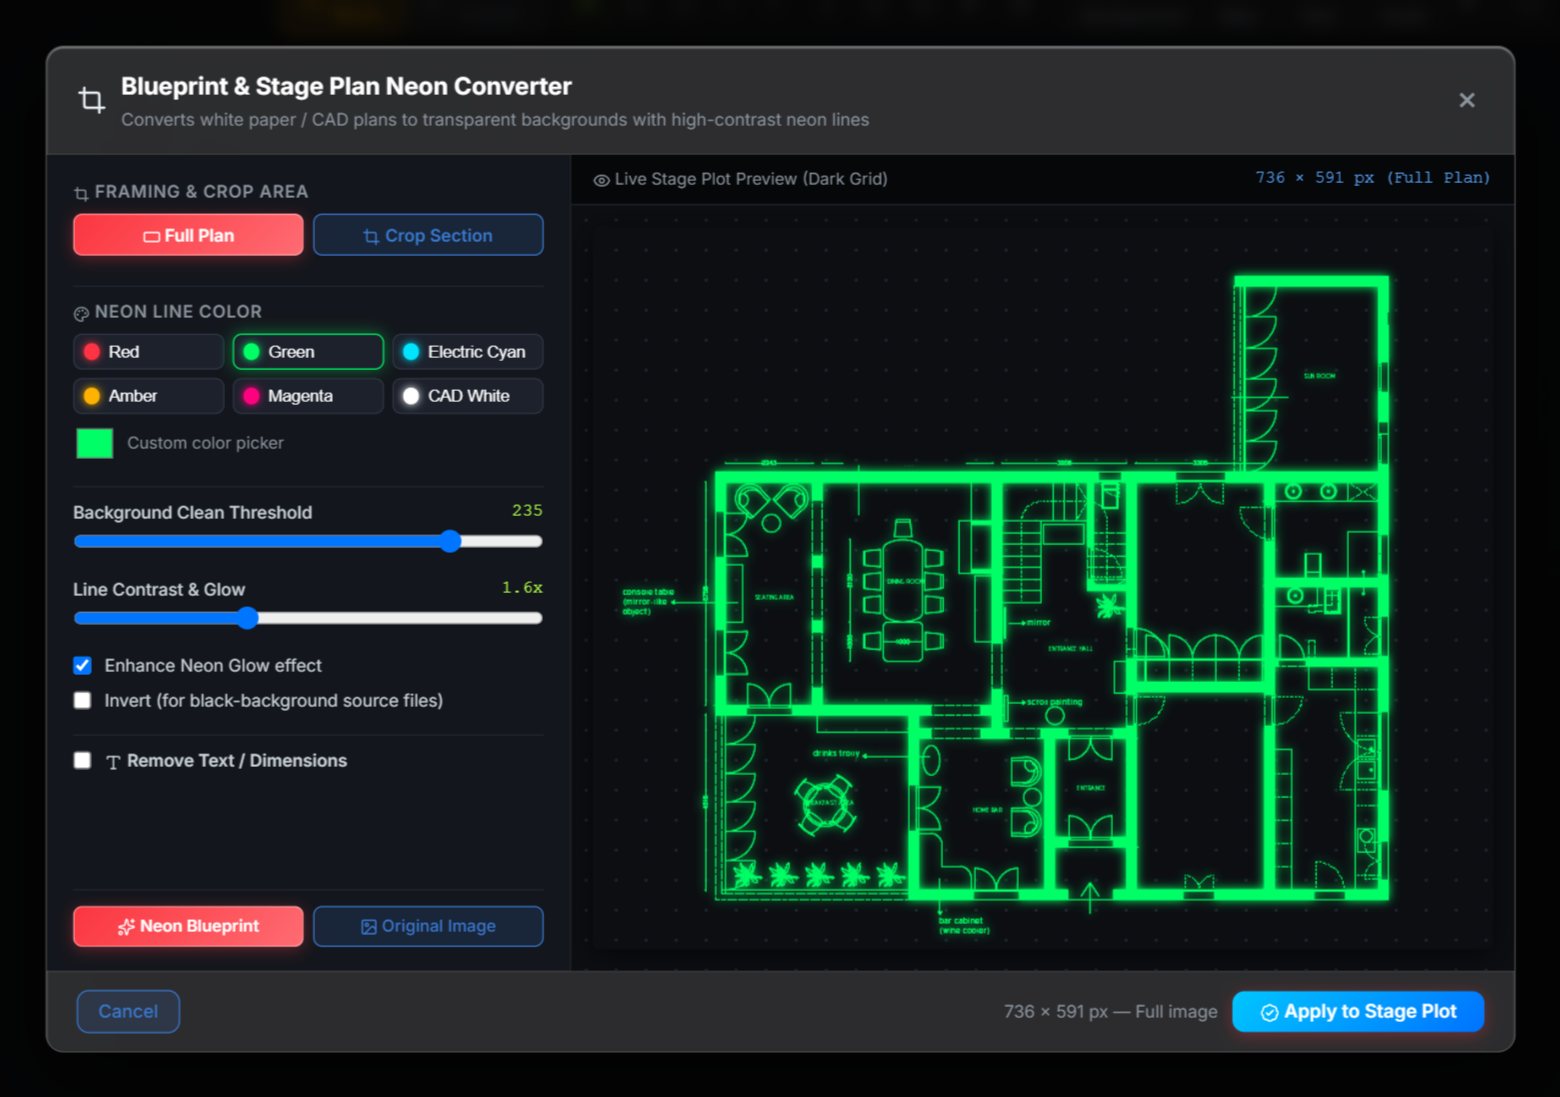
Technical drawing in neon (Blueprint Neon Importer)
For AutoCAD, Vectorworks or plain PDF drawings.
Load the drawing in the importer.
Crop the area: free, 16:9, 4:3 or 1:1.
Pick the neon colour (green, red, cyan, amber…) and adjust intensity, threshold and opacity.
Import it: the lines sit on a transparent background, on their own tab if you want.
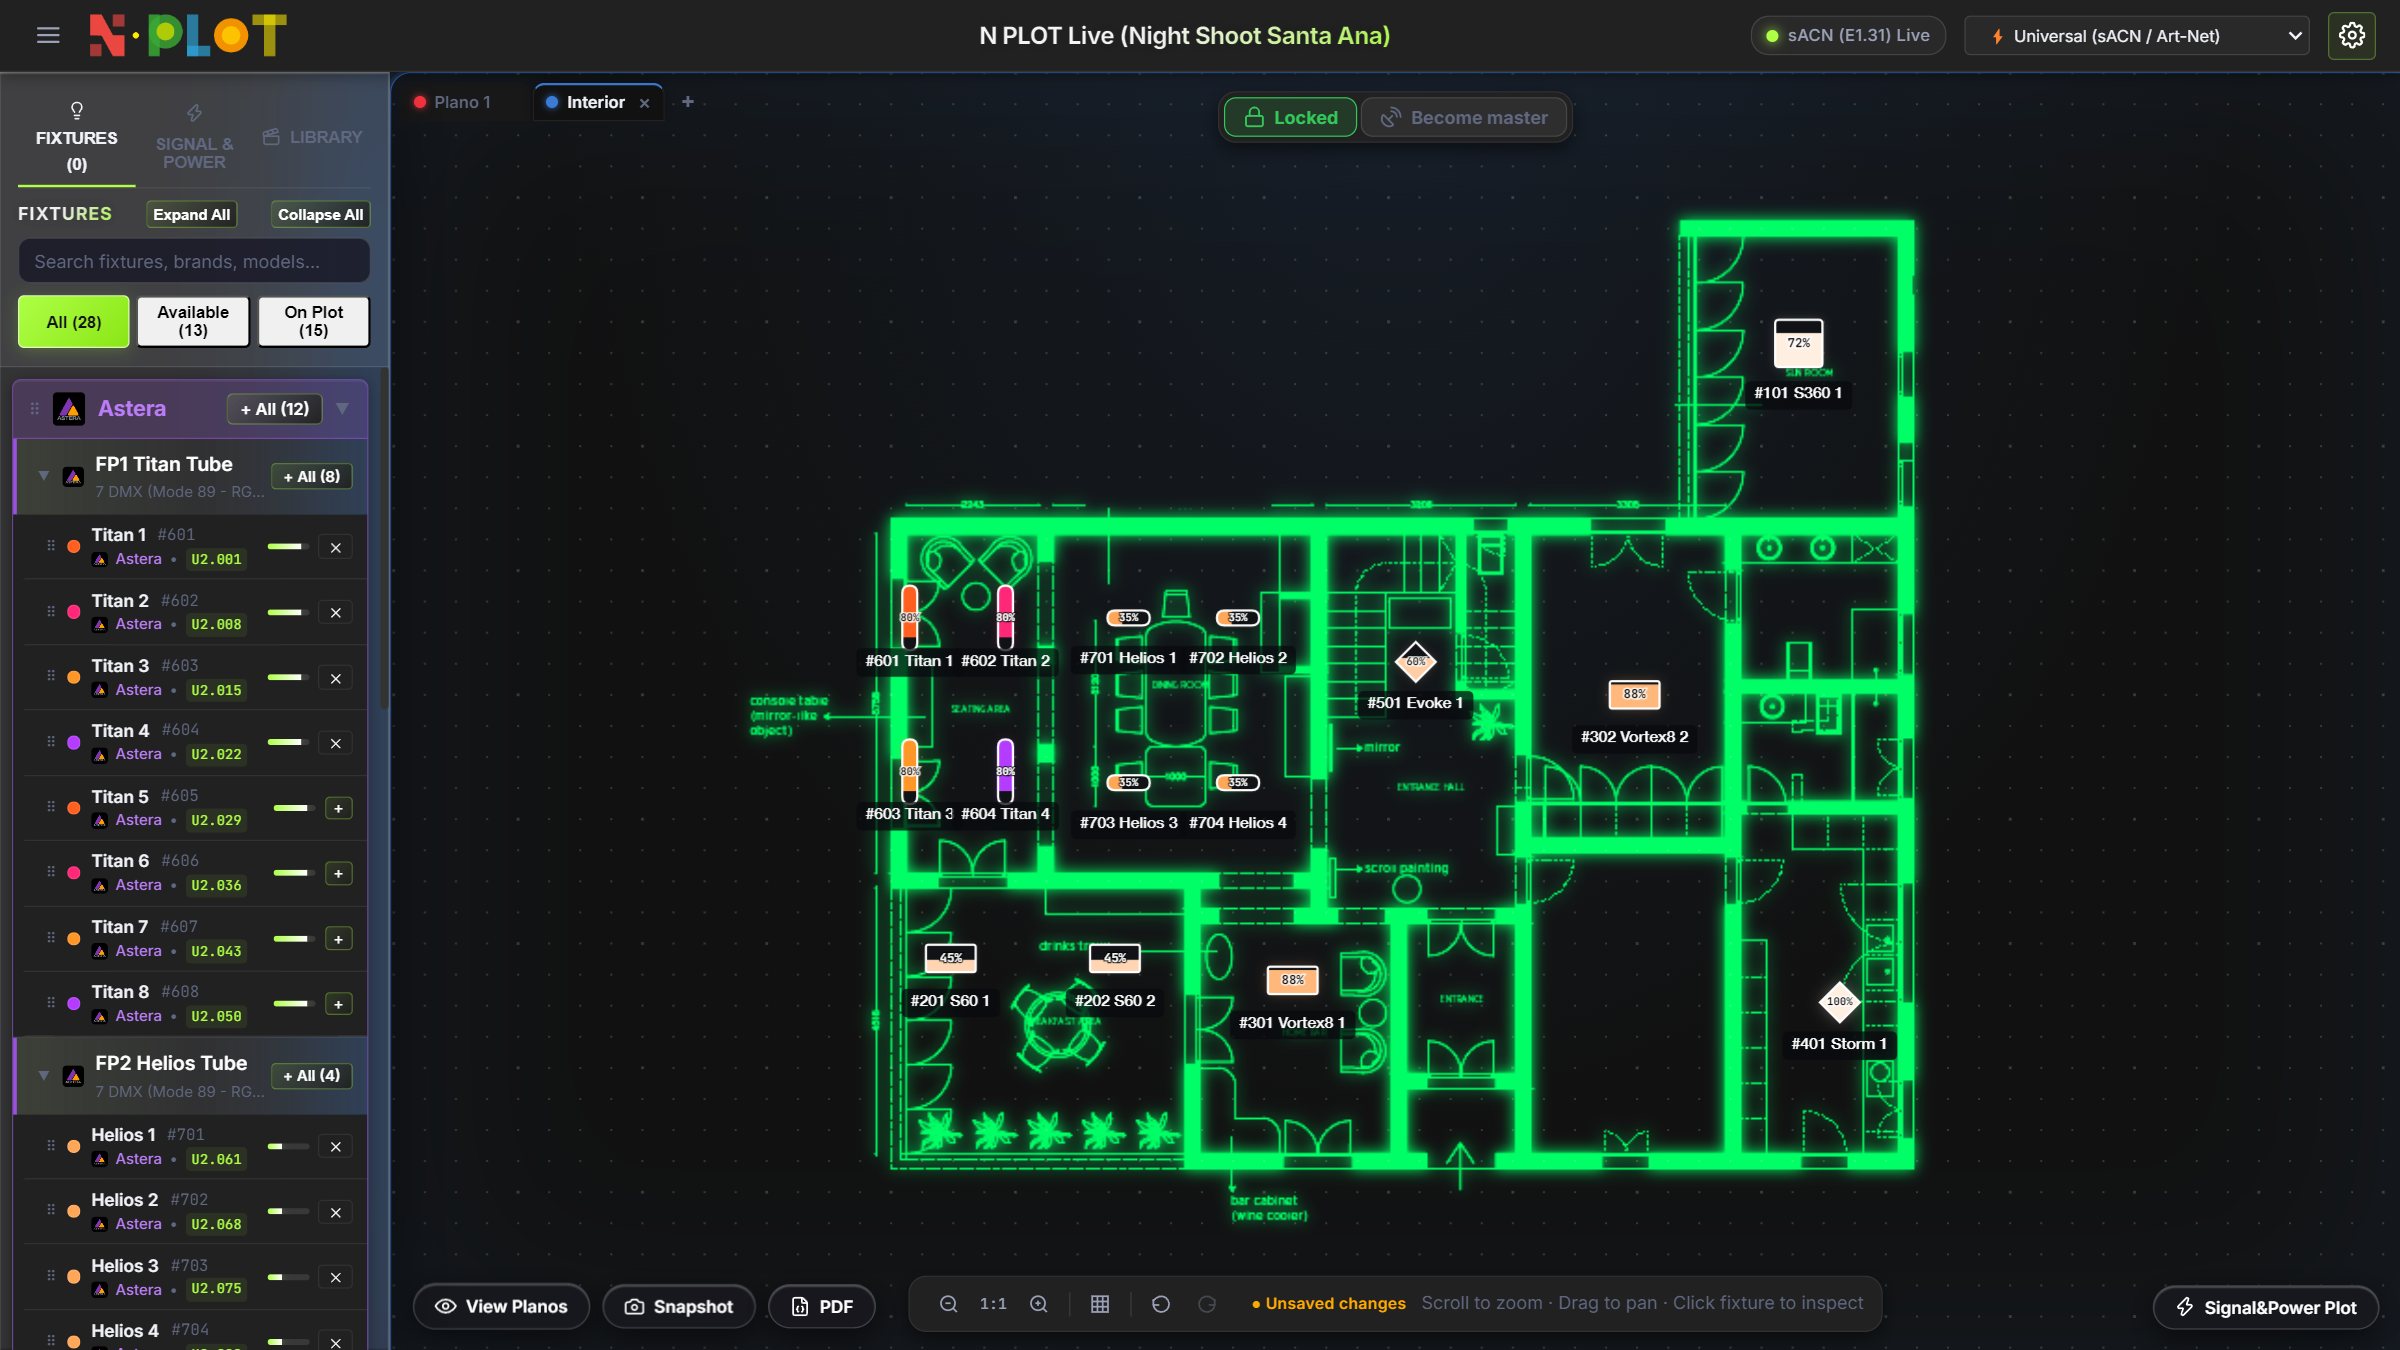
Blueprint Neon Converter: a plain floor plan turned into green neon lines.The converted drawing on its own tab, with fixtures in the rooms and live values.
Plan from a map (outdoors)
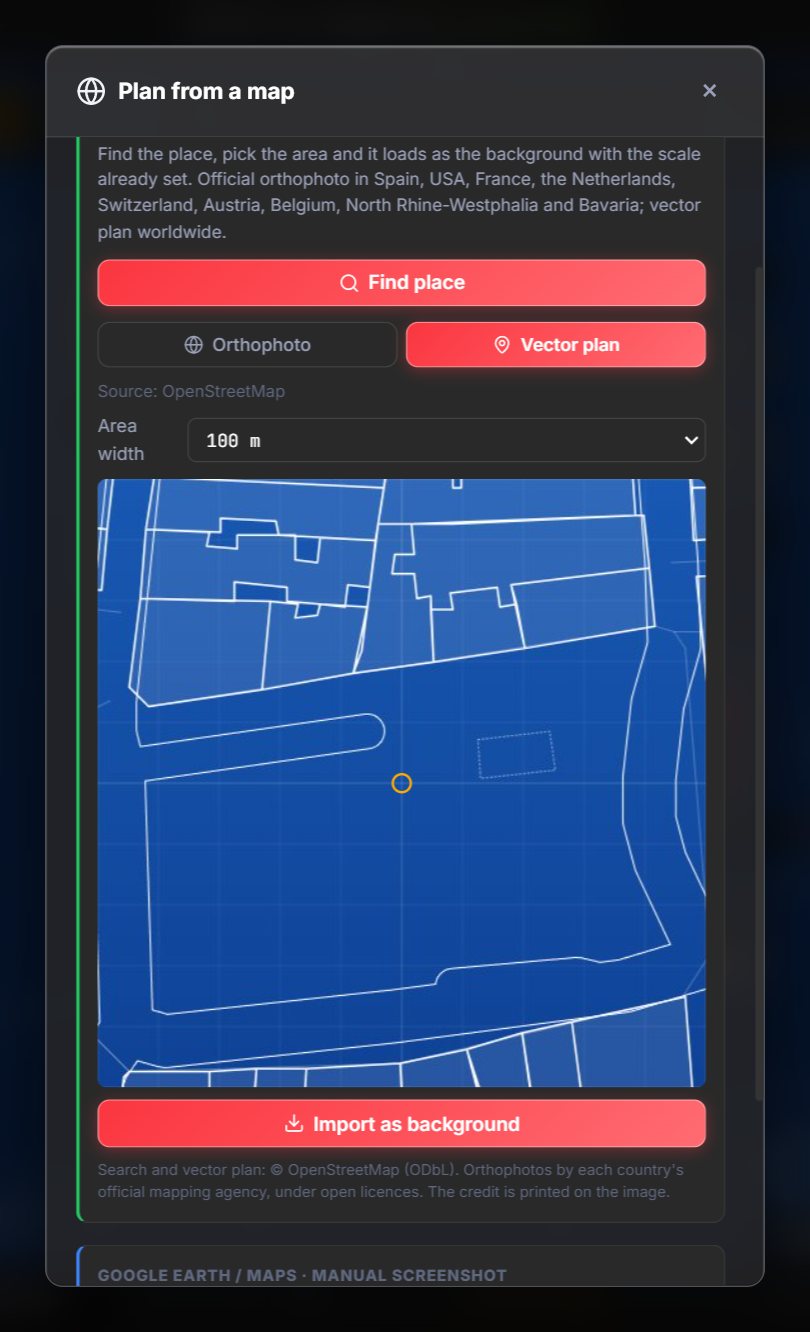
Open Plan from a map and type an address, a place or coordinates (for example, «Plaza Mayor, Madrid» or «40.4155, -3.7074»).
Pick the kind: Vector plan (OpenStreetMap streets and buildings, drawn as a plan) or Orthophoto (the official aerial photo, choosing the width of the area). There's a free orthophoto in Spain, the US, France, the Netherlands, Switzerland and other countries; where there isn't, the vector plan is used.
Press Import as background. It arrives with its scale already set; if the plano already had one, the app asks whether to replace it.
Google Earth / Maps: the same menu opens them so you can take a screenshot and import it as an image. That screenshot has no scale: calibrate it with the ruler.
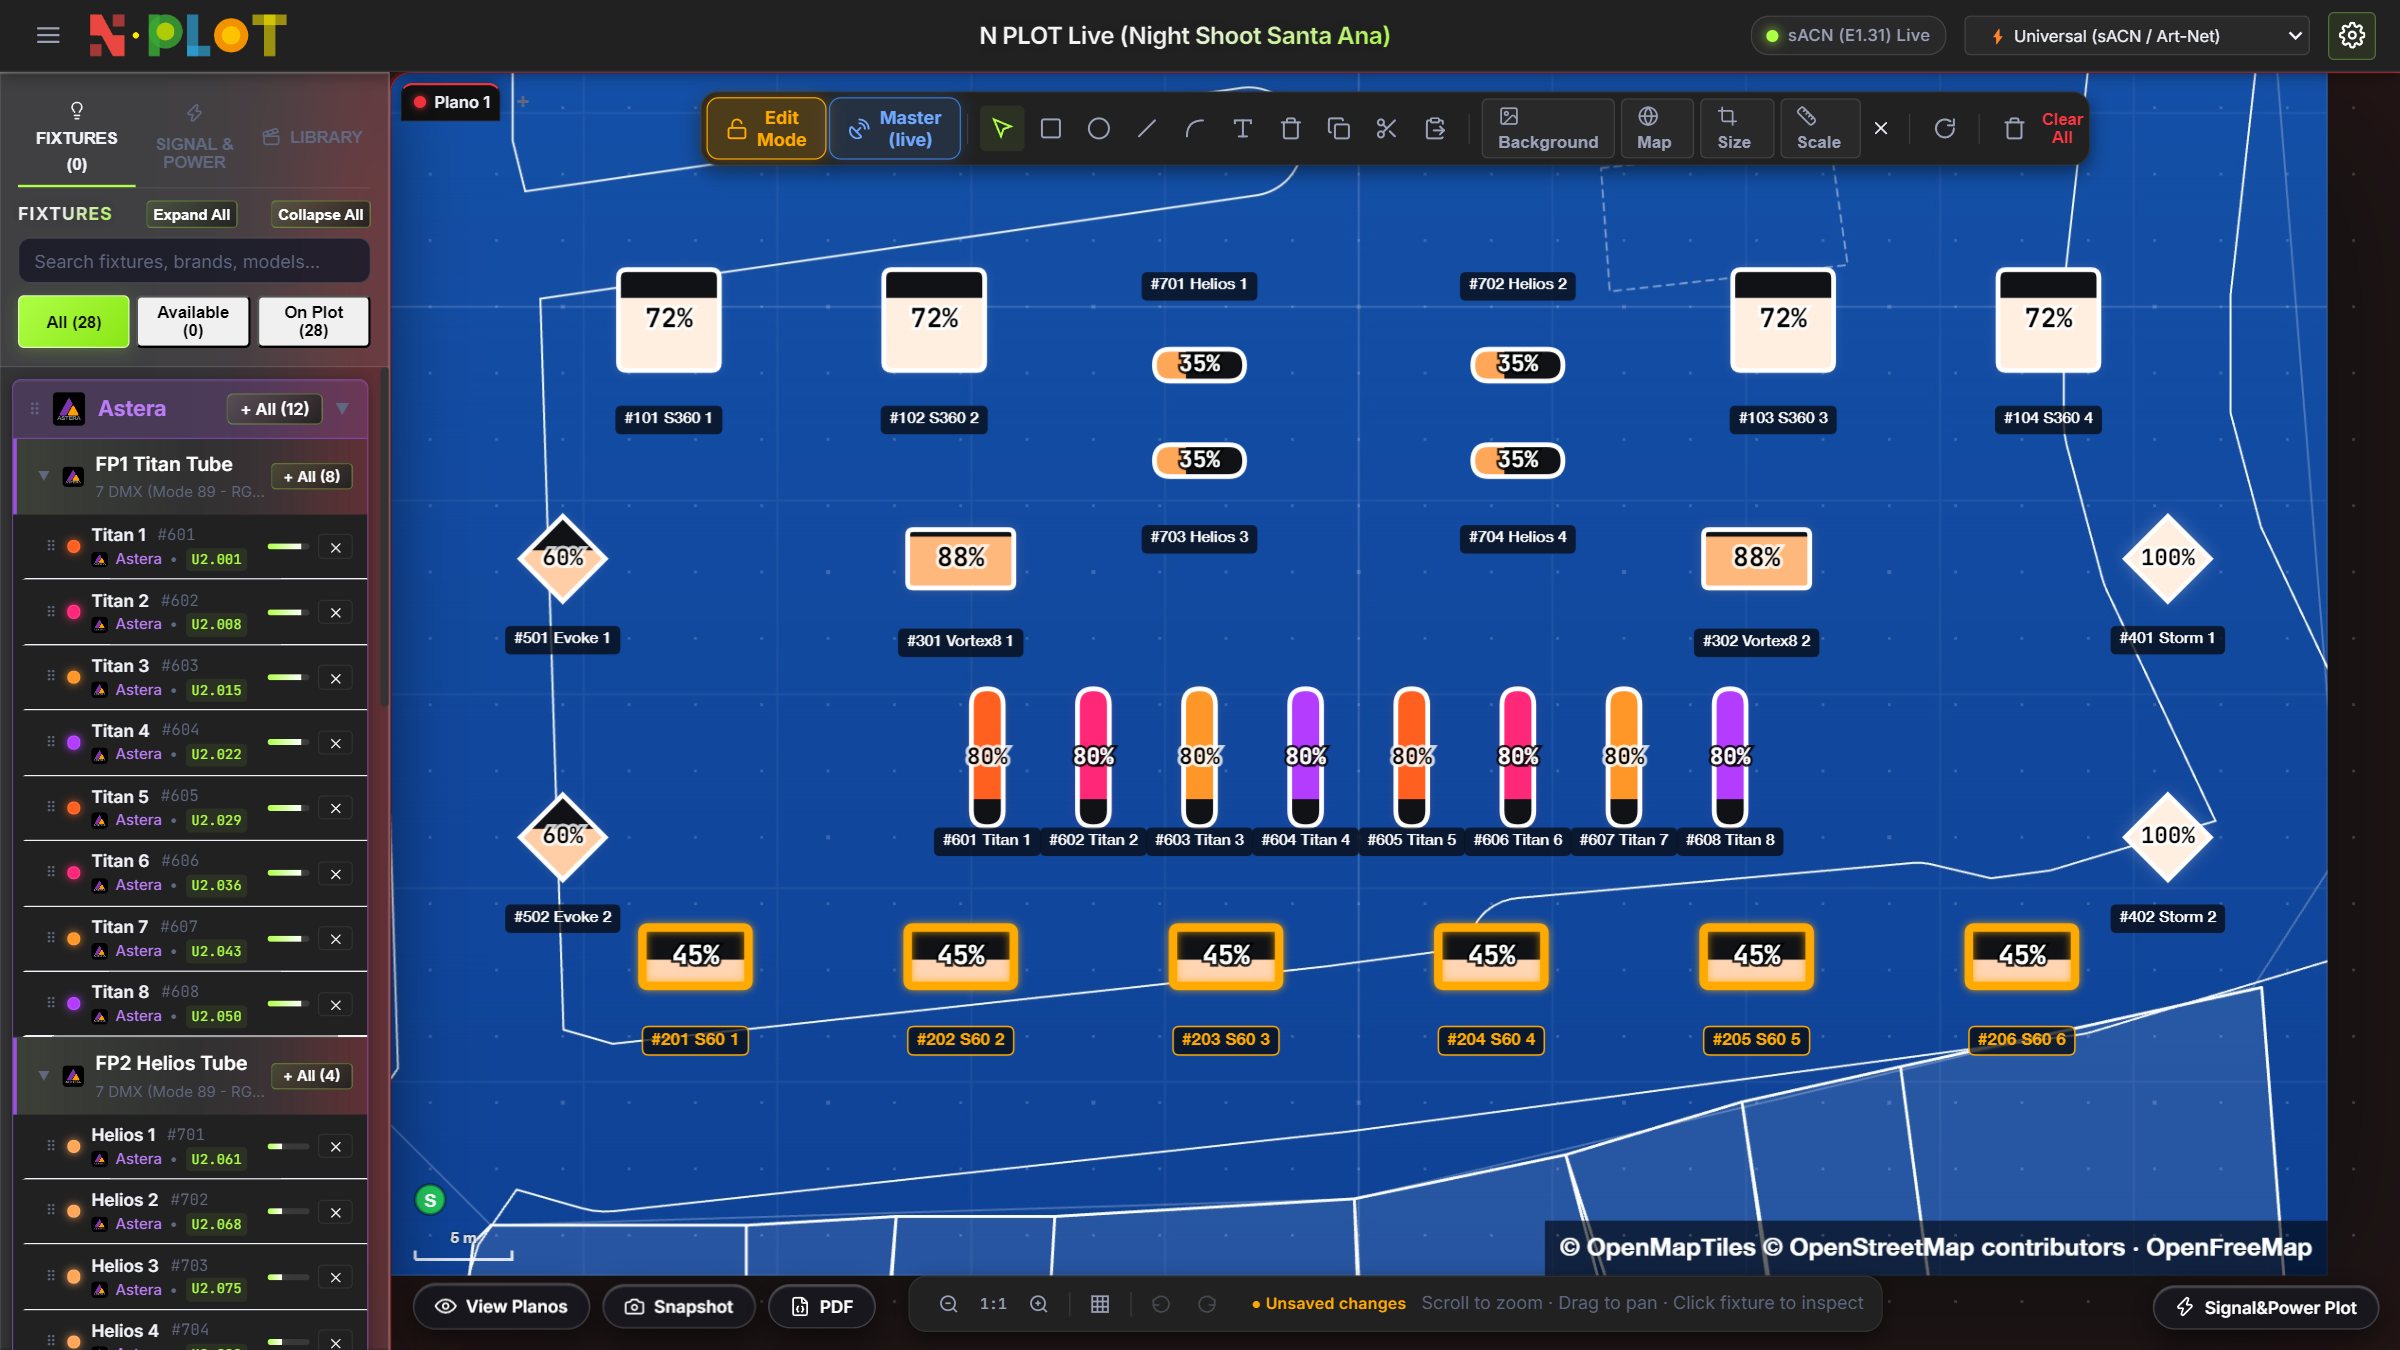
«Map»: a vector plan of Plaza de Santa Ana, with its scale already set.
The map and the orthophoto need internet. If the free OpenStreetMap servers are busy, try again in a moment.
Background opacity: the opacity button in the edit bar dims it so fixtures and cabling read better.
In the PDF the background prints in black on white paper, with fixtures and cabling in colour.
06 · The plan
Real scale
The scale turns the plan into metres: without it the PDF only counts cables and rigging is drawn at an approximate scale (two grid squares = 1 m).
Load a background. Without one, the tool warns: «Load a background plan first to calibrate its real scale».
In Edit Mode press Scale (ruler icon).
Draw a line over a distance you know: a door's width, the stage opening, a street.
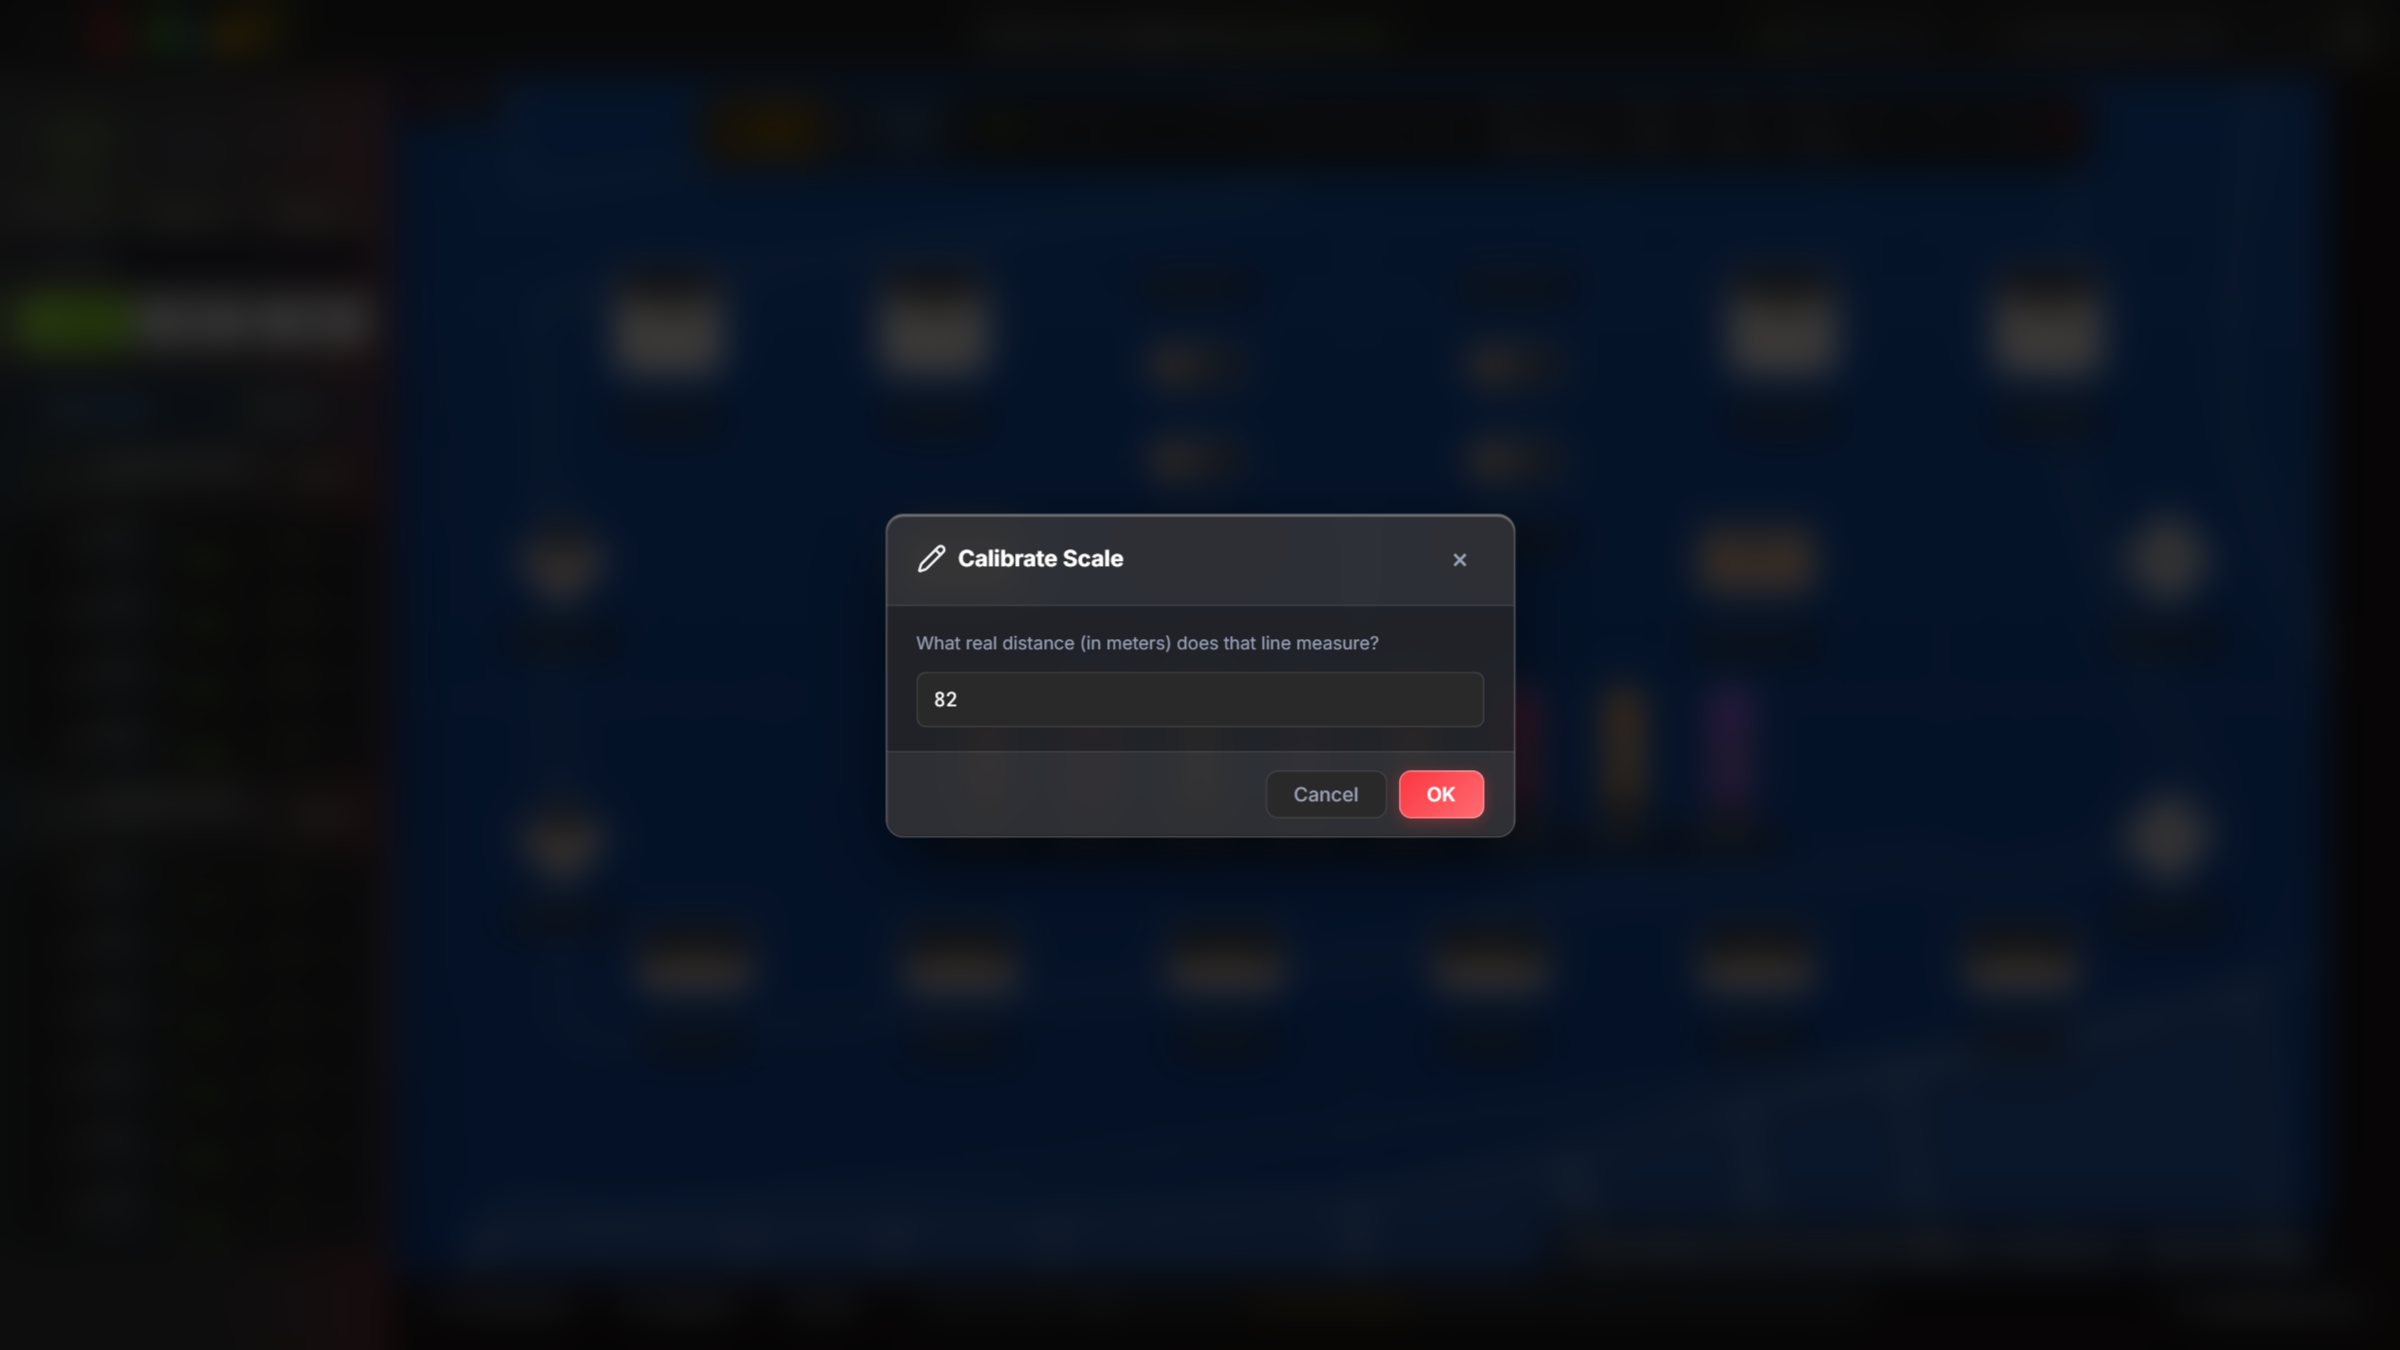
Type how many metres that line measures and accept. The app works out the units per metre.
Leave the mode with Esc.
After drawing the line over the background, N·PLOT asks for the real distance.
Check the scale by drawing the ruler over another known distance. If it doesn't match, calibrate with a longer line: the longer it is, the smaller the error.
Each plano has its own. The PDF's title block shows it («Scale: 50.0 u/m» or «Scale: not calibrated»). If you set the scale after drawing rigging, the rigging redraws at its real size; check it, because its positions don't change.
The vector plan and the orthophoto already carry their scale.
07 · The plan
Lock, editing and undo
The padlock in the top bar decides whether the plan can be touched: the plan starts locked.
Mode
What you see
When
Locked (Live Show Mode)
Nothing moves; a tap on a fixture opens its live values
During the show
Edit Mode
The edit bar: Background, Size, Scale, background opacity, Readable size, shapes, align and distribute
Recce, build, changes
Edit mode: the tool bar and six S60s selected to align.
Press the padlock to switch. Copy, cut, paste, move, rotate and delete only work in Edit Mode, and someone following another master can't open it (see Teamwork and iPad).
Undo and redo:Ctrl + Z and Ctrl + Shift + Z (or Ctrl + Y), or the arrows in the bottom bar. It covers fixtures, shapes, background, Signal & Power and rigging. A whole drag, an alignment or a spacing change undo in one go. The history is per plano.
08 · The plan
Fixtures on the plan
Fixtures come from two places: the patch (FIXTURES tab) or the library (LIBRARY tab), and they're placed by dragging them onto the plan or tapping + Add.
FIXTURES tab: the patch's fixtures. All, Available (not placed yet) and On Plot filters; search by model, brand or name; Expand All / Collapse All for the groups by model. Drag one, or a whole group, onto the plan.
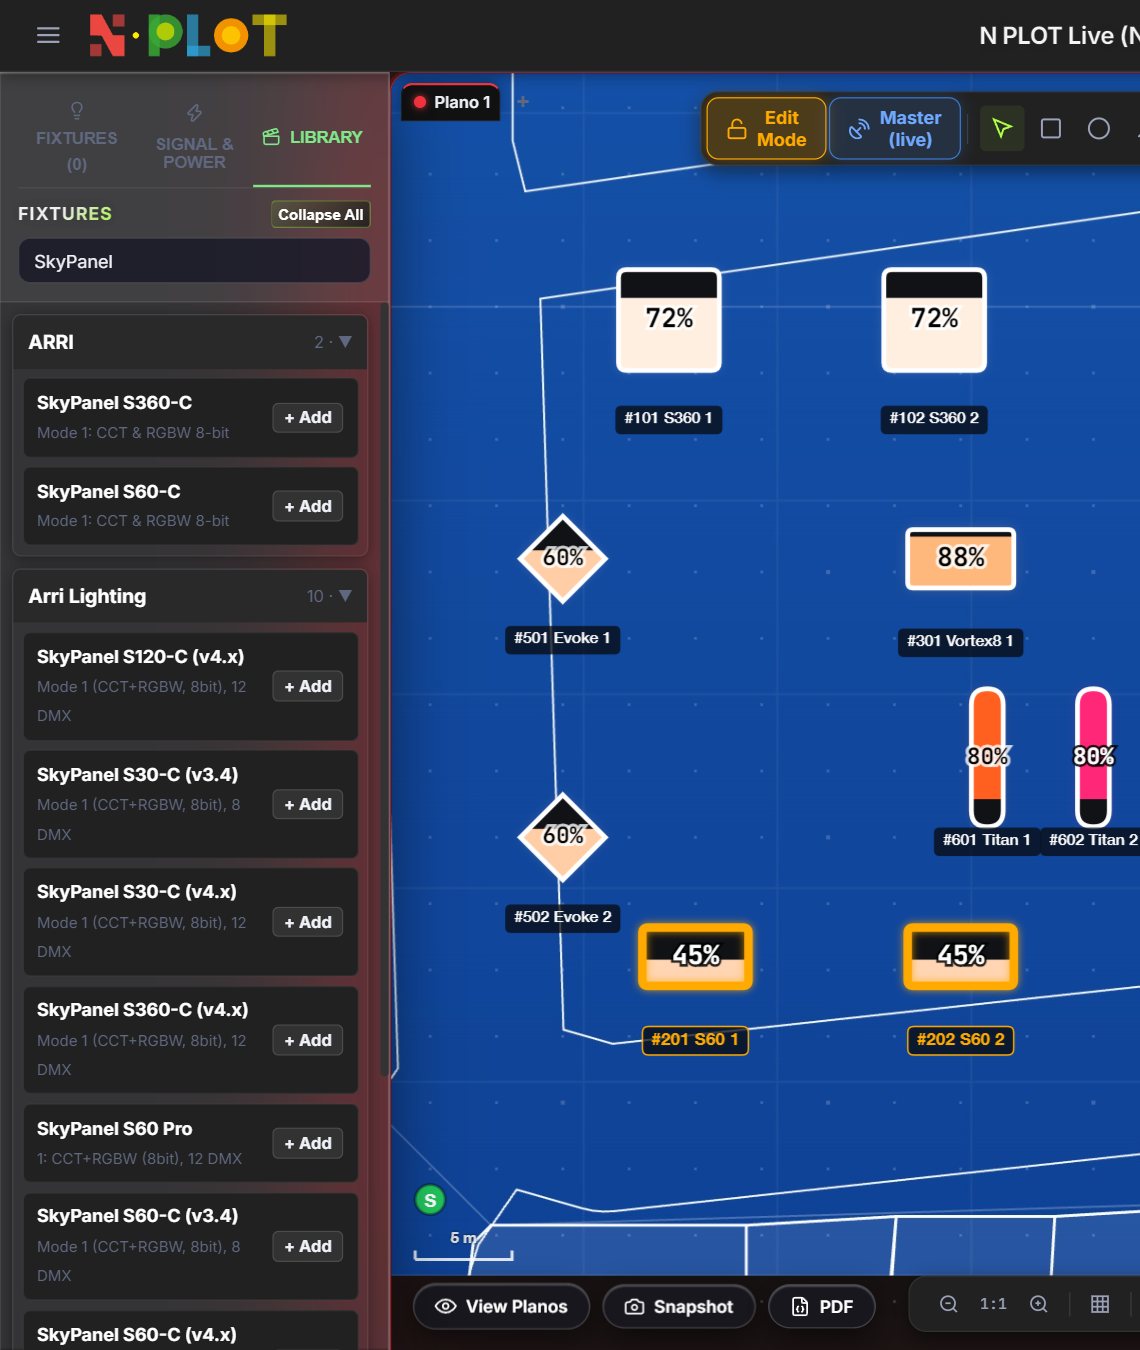
LIBRARY tab (recce)
The full database (about 1,175 brands, folded by brand) with search. A fixture placed from here:
numbers itself («Vortex 001», «Vortex 002»…);
is drawn with a dotted outline and slightly transparent: it's a placeholder, still unpatched;
goes into the PDF's equipment table and the Needs Excel;
is linked later to its patch row with Link to a patch fixture (see DMX patch).
Library: models to place during the recce before there's a patch.
Placing and moving (Edit Mode)
Drag the fixture. Several: a selection box on empty space; the group moves together.
Rotate 45°: the R key or the rotate button.
Align and distribute: with several selected the alignment bar appears (left, centre, right, top, middle, bottom, Distribute H, Distribute V) with a spacing slider that spreads or gathers the selection live.
Delete:Del or the fixture's menu.
Labels: double-click the fixture, right-click → Move Label or, on a tablet, press and hold for half a second: choose top, bottom, left or right. A label that would cover another fixture hides; selecting the fixture shows it.
Multi-pixel fixtures (tubes, bars, panels): each pixel is painted with its own value. In its panel you can flip horizontally, vertically or rotate 90° the order of the pixels to match how it's rigged.
Shapes and text: lines, rectangles, circles and text to mark set pieces, areas or notes. The shape bar changes colour, line width and fill; node editing moves its points. Shapes also align, copy and undo.
Readable size: fixtures hung on a truss are drawn to real scale; with the console connected this button keeps them from ever being smaller than 28 px so their value can be read.
09 · Signal and power
Signal
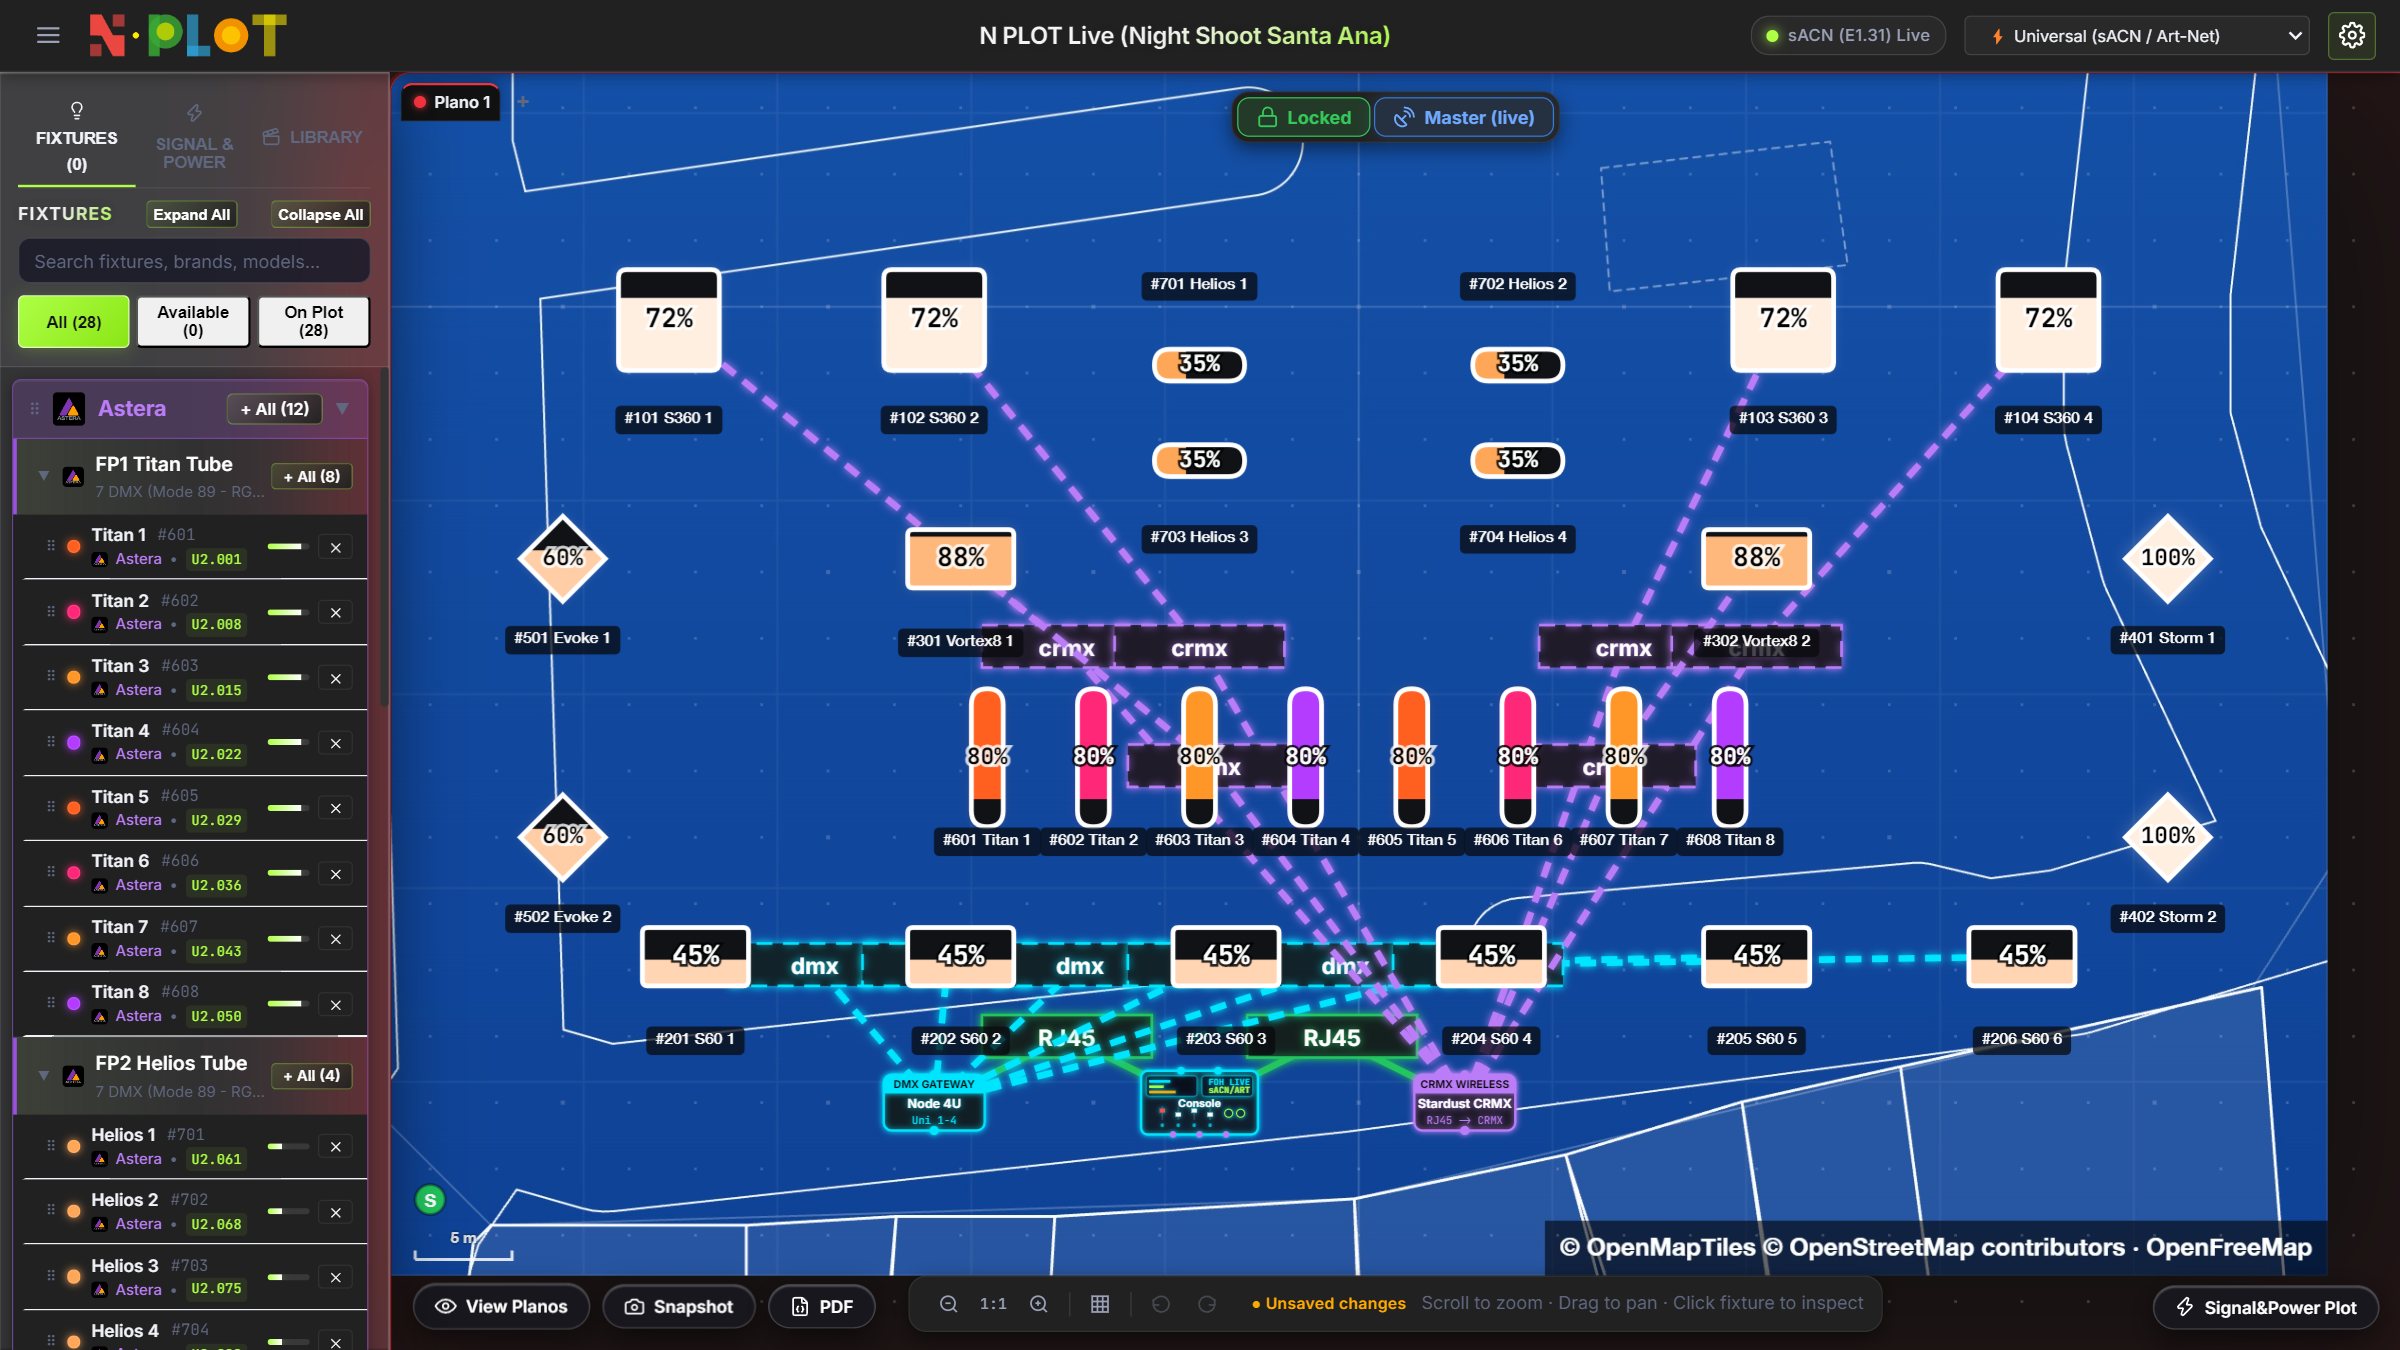
The Signal layer draws how DMX gets from the console to each fixture.
Placing equipment: the SIGNAL, POWER & RIGGING tab of the sidebar. Its sections fold and remember how you left them. Drag the device onto the plan or tap + Add.
Device
Inputs → outputs
Console
→ network (RJ45) and DMX
Node
Network → DMX
Switch / router
Network → network
Splitter
DMX → DMX
CRMX transmitter
Sends wirelessly to fixtures and dimmers; the SidusFOUR also has 4 physical DMX outputs
Signal layer: console, DMX node and wireless CRMX transmitter.
Connecting
Double-click the source device, or select it and press Connect in the selection bar.
Click the destination: another device or a fixture on the plan. The cable only goes from an output to a matching input; drawn the other way round it flips itself; with no matching port it isn't created.
To route it the way it will really run, click on the cable (adds a point) and drag the points.
Vertical run: right-click the cable → a control point with vertical metres, for what goes up to a pipe or down from a truss.
A cable's selection bar: cable type, port label («U1», «DMX A»…), edit and delete. A selected device has Edit (name, location, universes), Connect and Delete; right-click opens its menu with copy, cut and paste.
Loading and saving separately:Load opens a .tsignal or the signal part of a .tshow; Clear All clears the plano's Signal & Power.
10 · Signal and power
Power
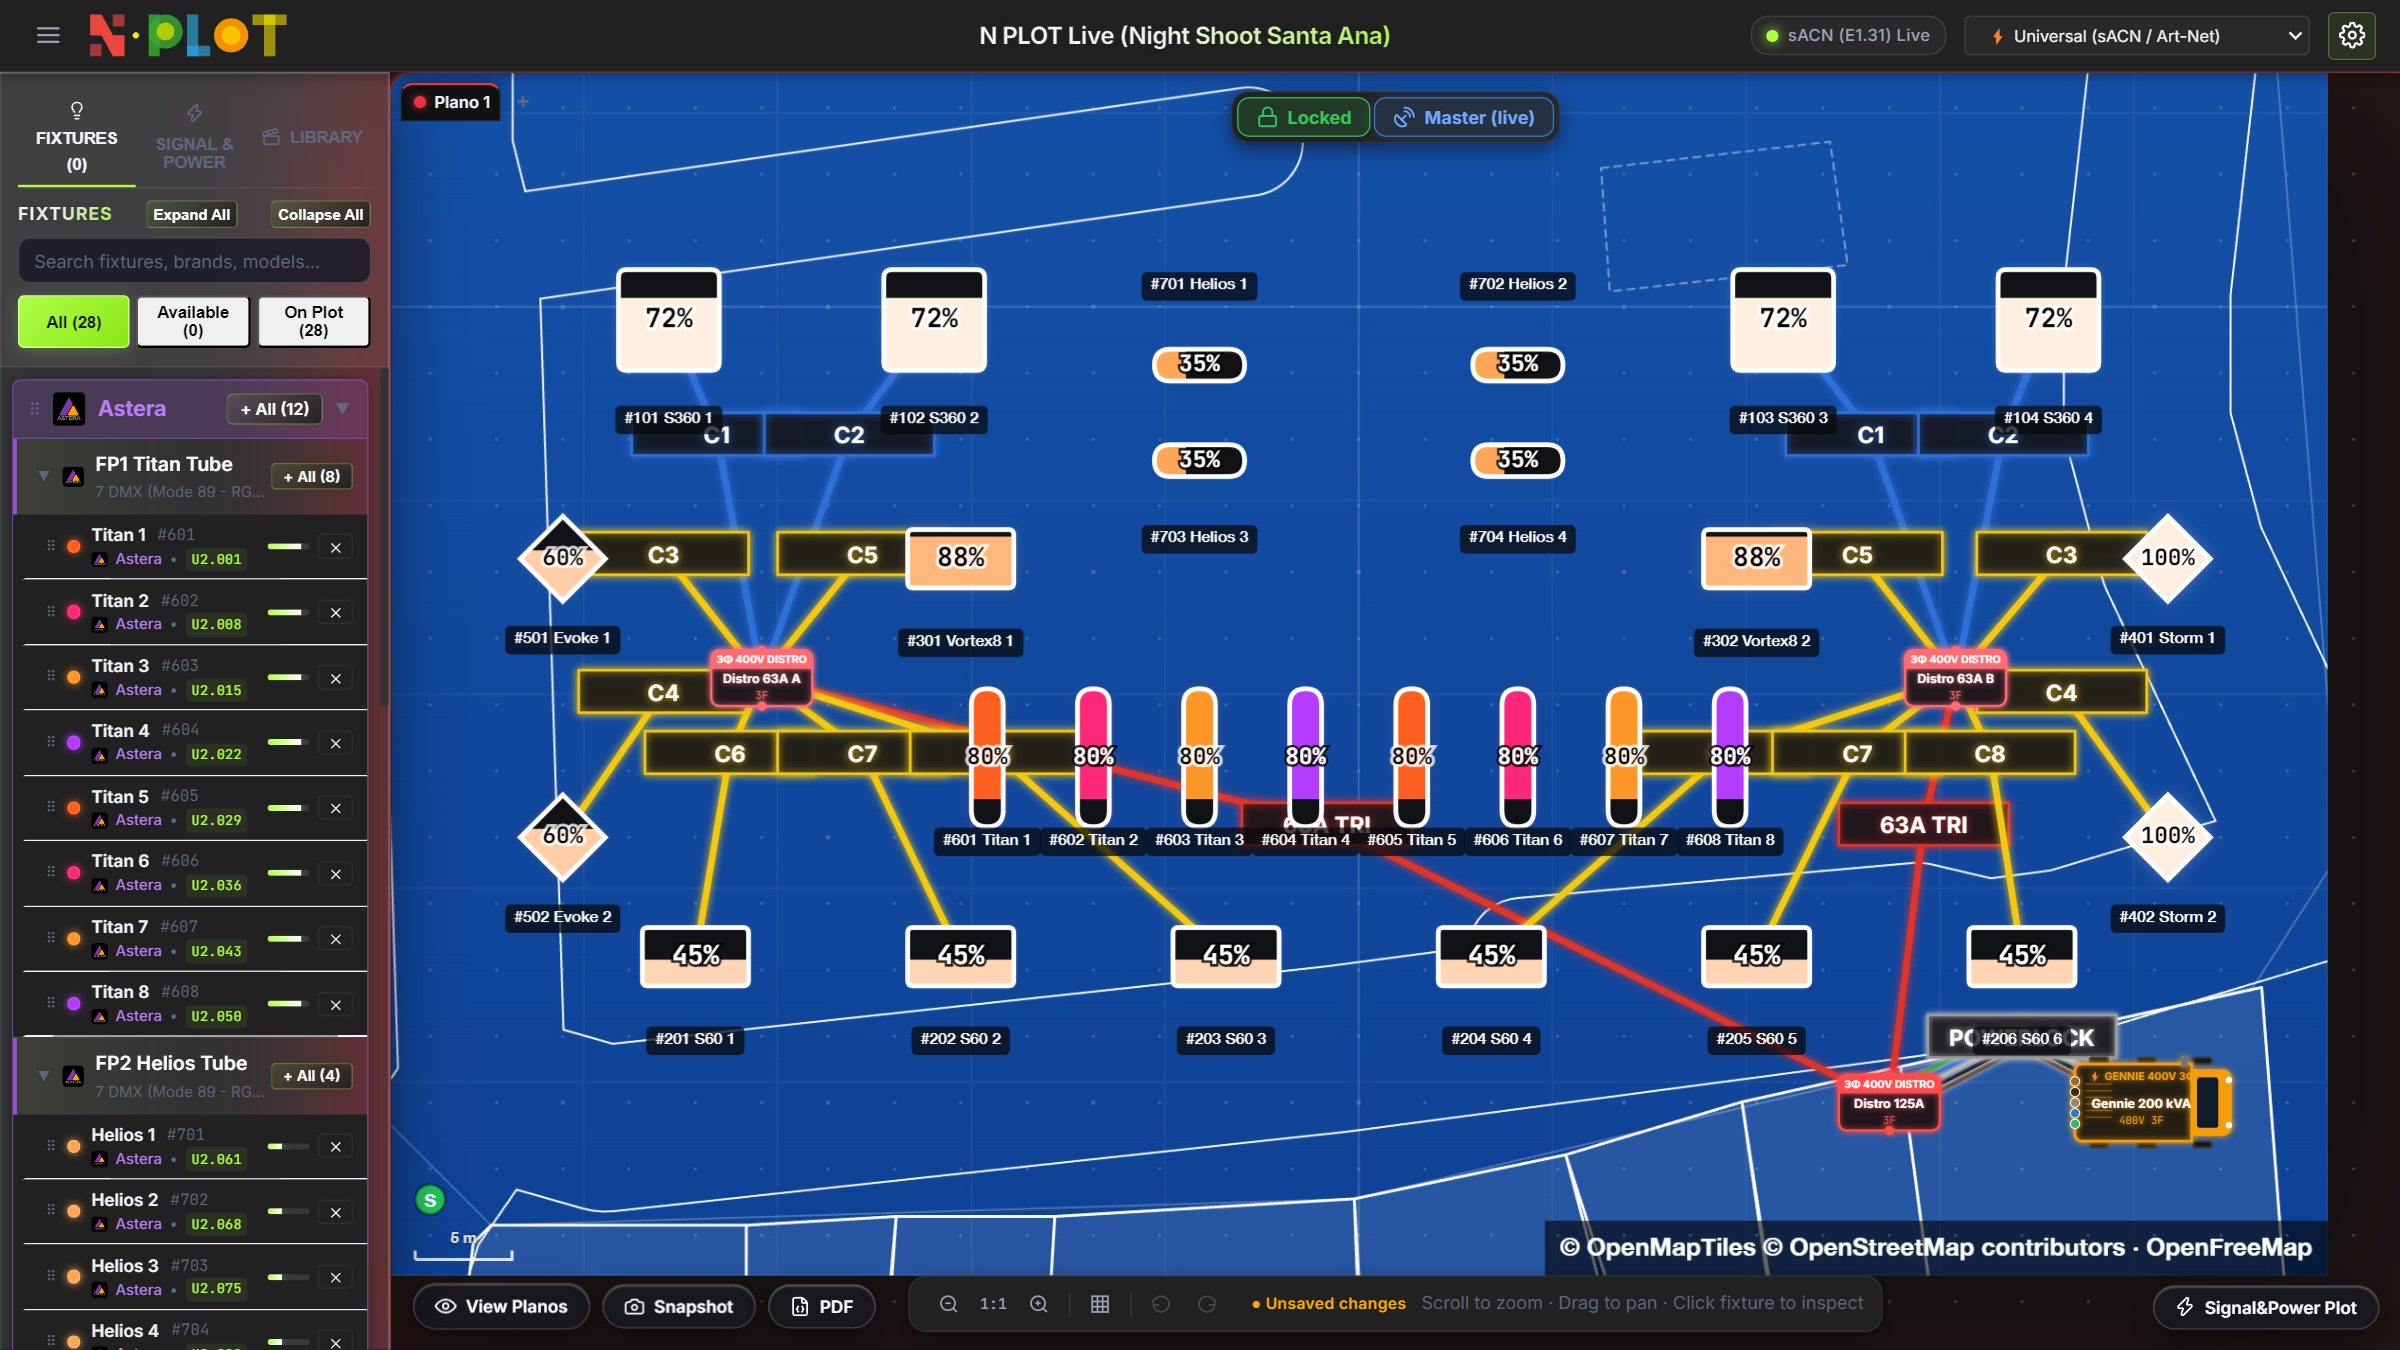
The Power layer draws the electrical distribution and warns before a circuit is overloaded.
Equipment: gennie (generator truck), PowerBox PowerLock 400 A and 250 A, distros, dimmer racks of 48, 36, 24, 18 and 12 channels, a 6-channel touring dimmer and socapex.
Power layer: gennie, distros and one circuit per fixture.
Connecting a fixture to power
Double-click the power device (or Connect) and click the fixture.
Pick the connector: Schuko, CEE 16 A, 32 A, 63 A (single or three phase), 125 A three phase or socapex. With socapex you pick output 1–6: each is a 16 A circuit.
Type or pick the circuit.
If that fixture takes the circuit over its capacity, the app warns you and asks to confirm. Each connector counts a 15 % safety margin on its rated capacity.
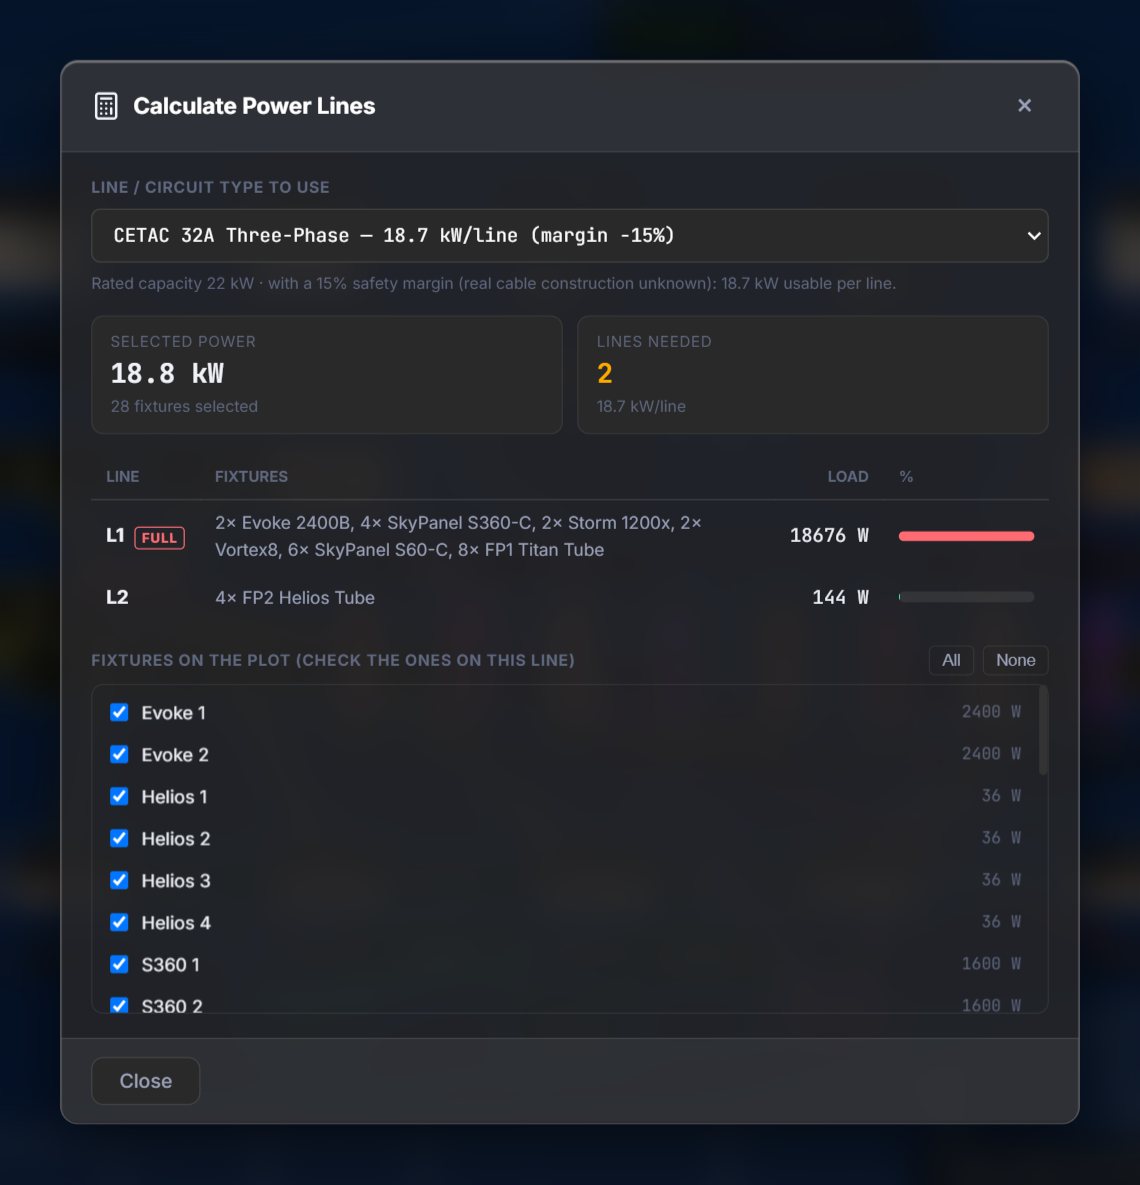
Calculate Power Lines
The SPR PLOT button → Signal, Power & Rigging menu:
Pick the line type (for example, «CETAC 32A three-phase — X kW/circuit»).
Mark the fixtures one by one or in bulk.
Read the summary: total power, lines needed and average use. Each line (L1, L2…) lists its fixtures with a load bar: green under 70 %, amber 70 to 90 %, red over 90 %; «FULL» when it's full.
Calculate Power Lines with the whole rig marked.
The power draw comes from the app's catalogue (over 100 models with their maximum draw). Fixtures without data are listed apart and don't count.
Cable runs (see Export and share): with the scale calibrated, the PDF gives the metres per cable type, straight and with margin.
11 · Rigging
Rigging: pieces
Rigging is drawn to real size with each maker's stock pieces; with the plan calibrated, what you see is what gets built.
Placing a truss: drag it from the Rigging group of the SIGNAL, POWER & RIGGING tab. If the plano has no scale, a notice reminds you.
A 6 × 3 m F34 frame with a T: box corners at the corners and at the T, a mark at each joint, and the truss catalogue on the left.
Stretching and turning: select it and drag one of its ends (white circles). The length moves in 0.5 m steps and the angle in 15° steps; hold Shift for a free angle.
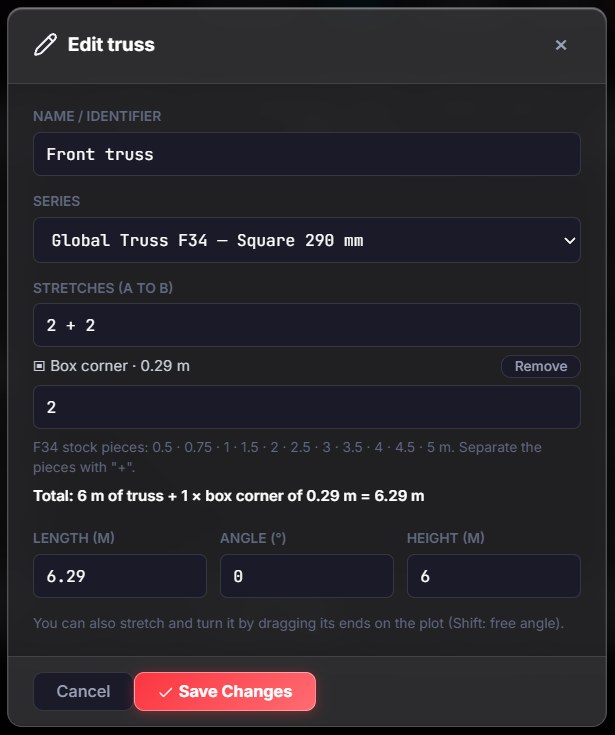
Stretches: in Edit there's one field per stretch, for example «2 + 2 + 2 + 2», with the total as you type. A piece that isn't stock is flagged and shows in red in the summary. Typing only the total length fills the last stretch with the fewest pieces (7 m F34 = 5 + 2). On the plan, a mark shows each joint between pieces.
Edit truss: two stretches (2 + 2 and 2) with the T's box corner between them and the total as you type.
Box corners: a box takes its real room, so an 8 m run with a box measures 8.29 m in F34. One forms when two square trusses meet at 90° (at a corner, or in a T). Each box has its Remove button in Edit. Triangle series use corners by angle (C19 45°, C20 60°, C21 90°, C22 120°, C23 135° in Global Truss).
T joint
Drop a truss, or its end, over the middle of another:
The box goes into the nearest joint (0.6 m away at most) or, if there's none, the stretch is split into two stock lengths.
The run grows by the box's size, and what lies past it moves along.
In a frame, the opposite side gets its own box at the same point, so the frame closes with stock pieces.
Hung fixtures move with their point. Removing the box undoes it all and leaves the T loose.
Circular truss: Global Truss F34 (Ø 2, 3, 4, 5, 6, 7, 8 and 10 m, F34R… arcs) and Prolyte H30V (outside Ø 2, 4, 8 and 12 m). In Edit you pick series and diameter. The sizes come from dealers: check them with the maker. It doesn't join straight truss yet.
Tube (Ø 48.3 mm): stretches in 10 cm steps. Dropped on a truss, it's held by a coupler (yellow square) on every truss it touches and moves with it.
Hoists: 250, 500, 1000 or 2000 kg, with their height, marked «M».
Lifts: articulated boom (6.8 × 2.3 m, 15.7 m working height), scissor (2.5 × 1.2 m, 12 m), telescopic (9 × 2.4 m, 20 m) and Manitou (5 × 2.3 m, 14 m). They're drawn at 60 % of their size; the real sizes are edited in their window.
Names: each piece's name and length only show while it's selected, to keep the plan clean.
12 · Rigging
Structures, heights and legs
Joined pieces form a structure that is selected, moved and turned as a whole, with its hung fixtures.
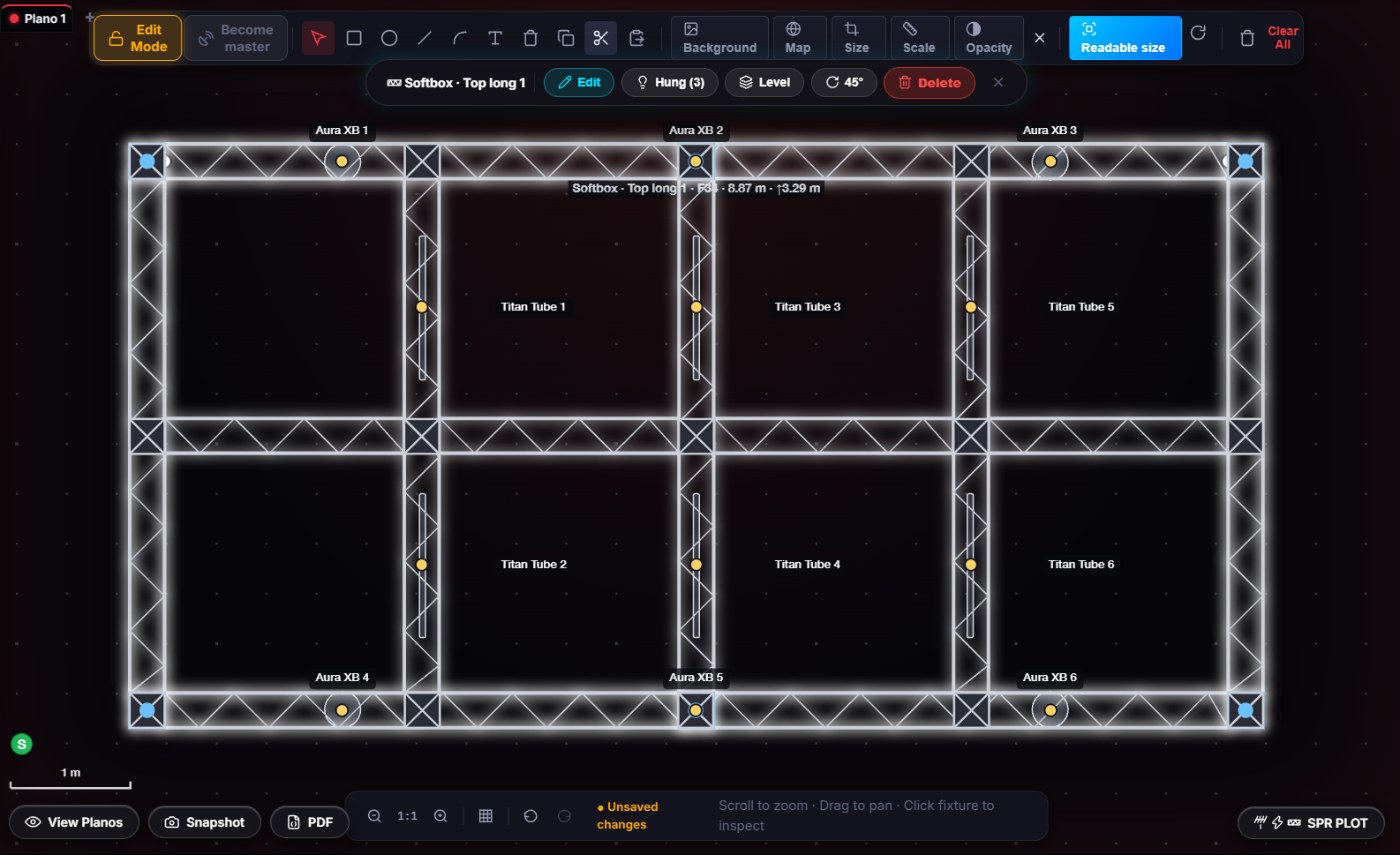
Selecting and moving: a tap on any piece selects the whole structure (highlighted); only the tapped piece shows its name. Drag it and its fixtures and tubes go with it, as many times as you like. With the structure selected, Del deletes all of it (undo with Ctrl + Z).
How something joins a structure
Only on purpose:
Drag a loose truss, or one's end, to the end, corner or middle of another.
Drop a tube on a truss.
Drag a loose leg next to a box corner.
Moving or dropping a structure on top of another does not join them. Remove joint (right-click the piece) takes it out of its structure; it joins again when you take its end to another.
Turning: the R key or 45° in the selection bar. It turns the whole structure about its centre, with its fixtures.
Heights (levels): each piece's height (Edit → Height) is the underside of the truss above the floor. Only pieces at the same height join; pieces with no height join anything, as in older plans. When two frames sit one above the other on the plan, the higher one is drawn on top and gets the taps. Level, in the selection bar, switches to the piece underneath.
A whole structure selected: blue legs at the corners, the bar with Hung, Level and 45°, and the fixtures in place.
Legs (vertical truss)
Drag Truss leg (vertical) onto the plan: it shows as its section with an X, in blue.
Take it next to a box corner: it goes underneath and fits the gap between the box below (or the floor) and the one above.
In Edit leg: series, pieces bottom to top («2 + 2»), where its foot is, angle and Base plate when it stands on the floor.
The box a leg goes through shows a blue dot and counts one more way. Changing a leg changes the equal ones in its structure, and whatever sits on them goes up or down with them.
13 · Rigging
Softbox generator
The Softbox generator builds a complete light box (top frame with its grid, legs and floor frame) from a few sizes.
In the SIGNAL, POWER & RIGGING tab, add Softbox generator.
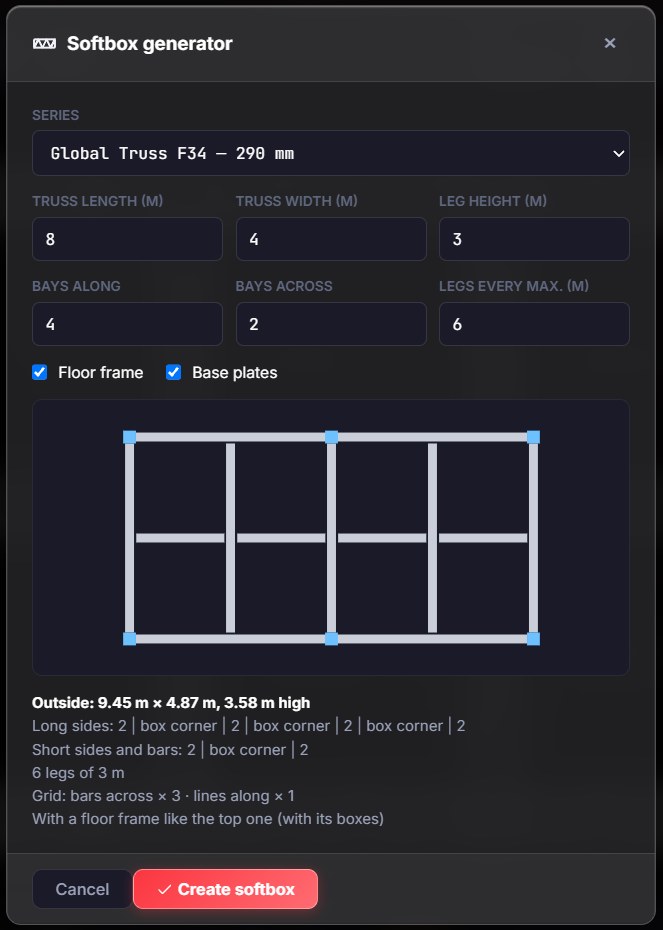
Fill in the window (table below).
Check the top view and the text under it: outside sizes (for example, «Outside: 9.45 × 4.87 m, 3.58 m high»), the pieces of the sides, the legs and the grid. If the length or width can't be split with stock pieces, the window says so.
Press Create softbox. It appears in the middle of the view, selected as a whole. The window remembers the sizes for next time.
Field
What it is
Example
Series
Square ones only (they have box corners): F34, F44P, H30V, H40V
F34
Truss length
Metres of truss on each long side, boxes not counted
8
Truss width
Metres of truss on each short side
4
Leg height
Length of the legs
3
Bays along
How many parts the length is split into: each split is a bar across
4
Bays across
Each split is a line along
2
Legs every max.
Largest distance between legs on the long sides (long boxes get intermediate legs)
6
Floor frame
A frame like the top one on the floor, with its boxes, so the legs stand plumb
Yes
Base plates
One per leg that stands on the floor (without a floor frame)
Yes
Softbox generator: the sizes, the top view and the summary before the box is created.
What it creates: continuous long sides with boxes where the bars arrive; bars from side to side; lines along in stretches between the bars; all at the same height. Legs at the corners and along the long sides. The pieces are named «Softbox · Top long 1», «Softbox · Bar 2», «Softbox · Leg 3»…
Afterwards: it's a normal structure. It moves, turns, takes hung fixtures, takes T joints (the box goes into the long sides and the lines so everything stays square) and changing a leg changes them all.
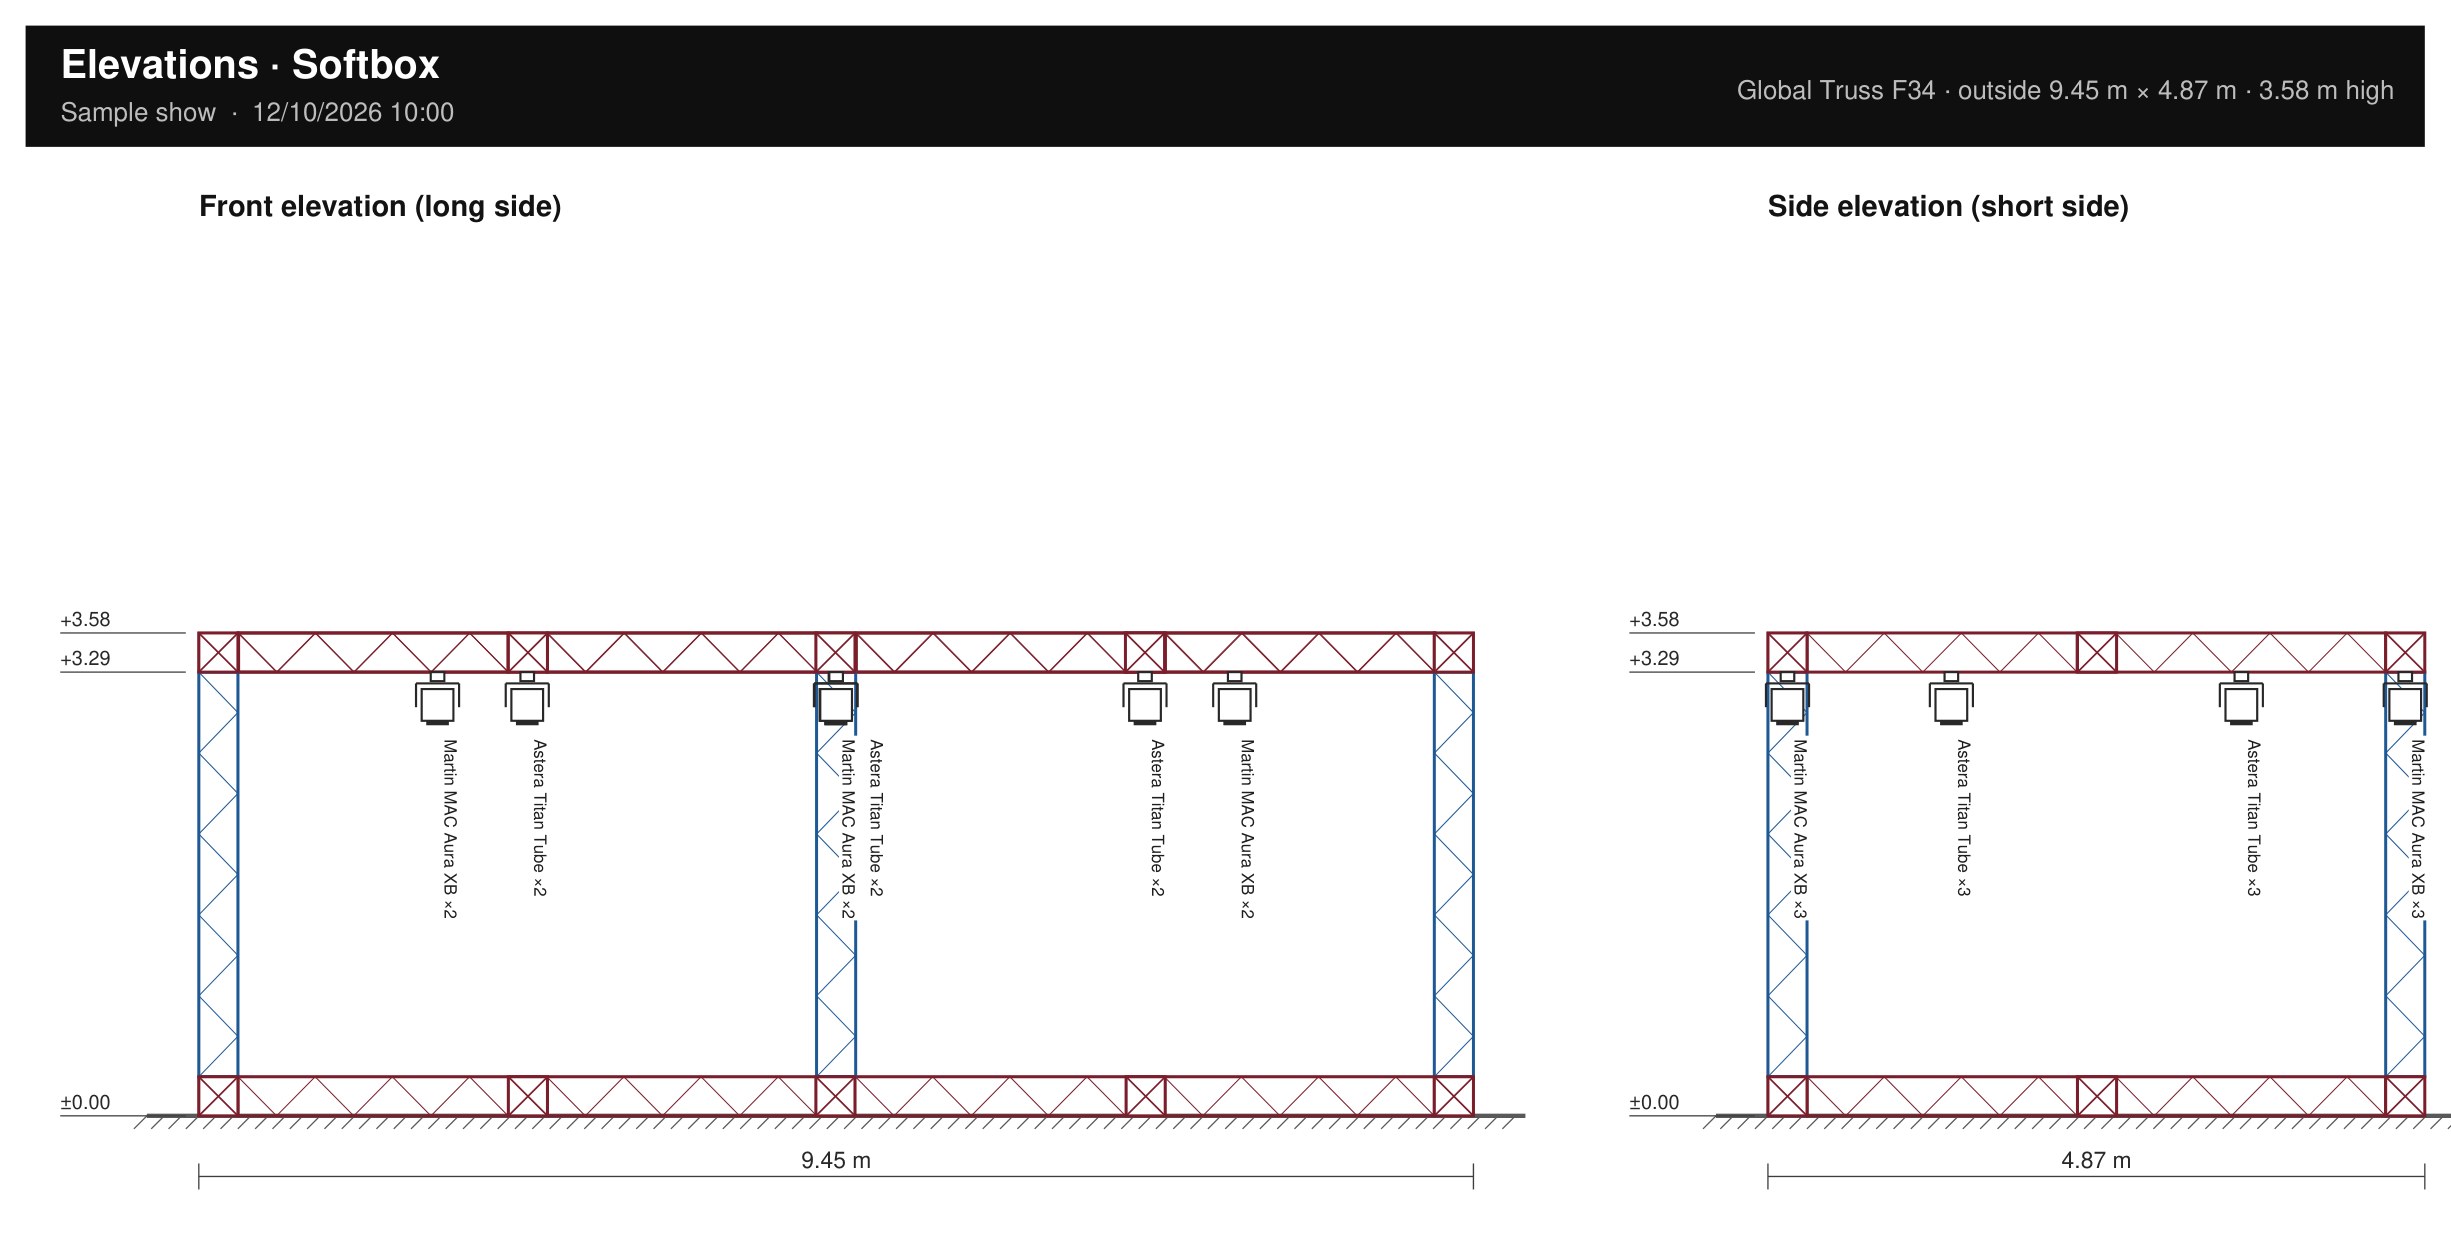
Elevation in the PDF: each softbox gets a page with its front and side elevation at the same scale: truss with its joints, legs in blue, boxes, levels (±0.00, +4.29, +4.58), outside sizes and the hung fixtures with their model. It's included when the Rigging layer is visible on export.
Front and side elevation in the PDF, with the levels, the outside sizes and the hung fixtures.
14 · Rigging
Hanging fixtures and rigging summary
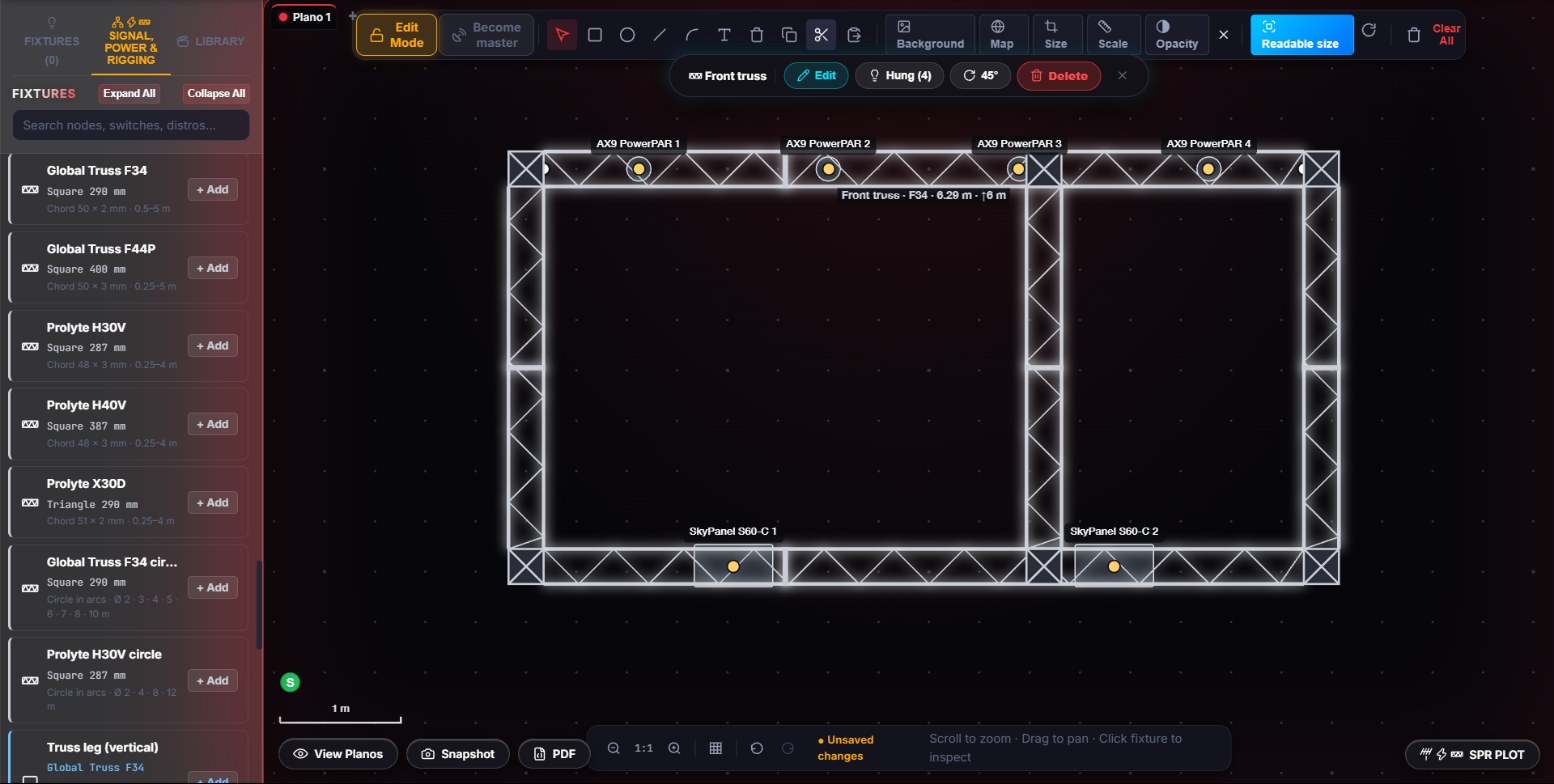
A fixture hangs from a truss or tube at a real point, measured from end A, and follows it when the structure moves, turns or changes.
Hanging
Drag the fixture on the plan and drop it on the truss or tube. Over two stacked frames, it hangs from the top one.
To hang many at once, drag a group from the list and drop it on the truss: they spread along it.
The fixture sits on its clamp (yellow dot) and its label moves beside the truss. If you move it away, it stays hung and a thin line ties it to its clamp.
Moving the clamp: drag it along the truss (5 cm steps); «A → 2.5 m» shows while you move it.
Unhang: the fixture's menu → Unhang, or in the hung panel. The fixture stays on the plan.
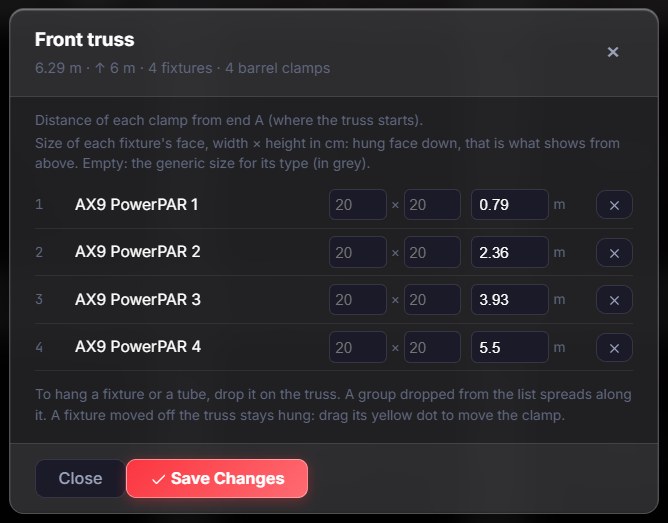
Hung (n) panel (the truss's selection bar or its menu): the fixtures in order with each clamp's distance from end A (editable), the size of its face in cm (width × height, what shows from above when hung face down; empty = the generic size of its type), unhang, the number of clamps and the tubes held.
Hung on the front truss: each fixture with its face size and its clamp's distance.
To scale: hung fixtures are drawn at their real size. Without a console, face down under the truss; with the console connected, face up on top, with their colour and value. Readable size (edit bar) keeps them from ever being smaller than 28 px with a console.
Rigging summary
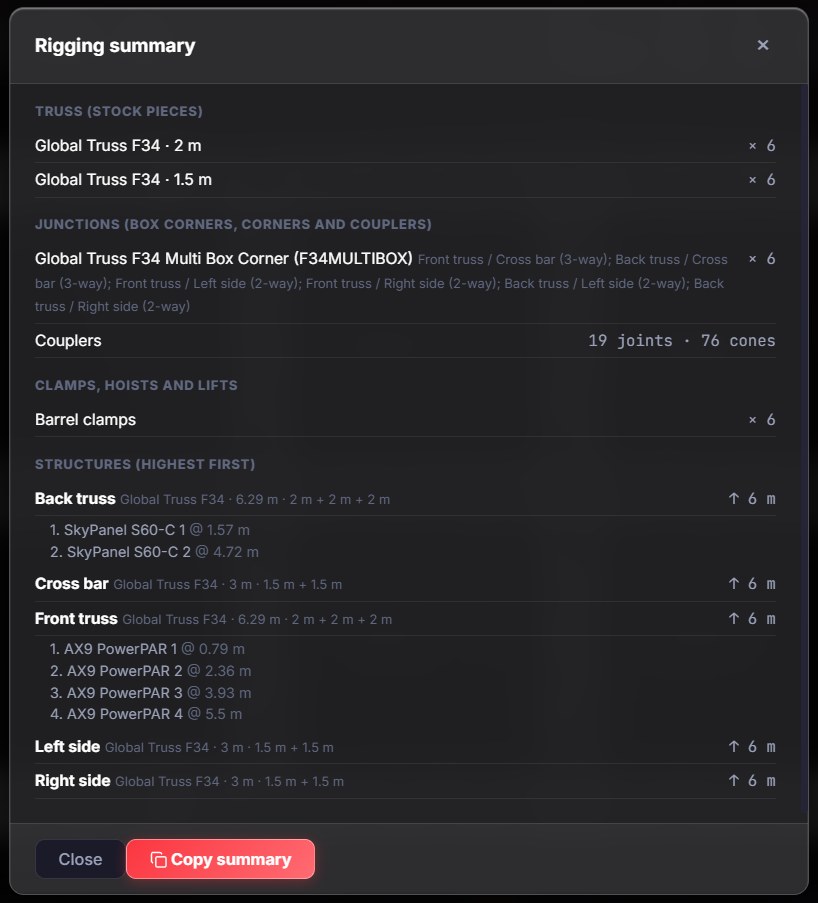
SPR PLOT → Rigging summary:
Section
What it counts
Truss
Pieces by series and length; non-stock ones in red with their structure
Junctions
Box corners (F34MULTIBOX, BOX-30V, BOX-40V) and corners, with where each goes and how many ways it uses; coupler sets and cones (one per chord at each joint)
Tubes
Count, metres and runs
Hardware
Clamps (one per hung fixture), tube couplers (fixed or swivel by angle), base plates, hoists by capacity, lifts by type
Structures
Highest first: type, length, pieces, height and their fixtures with their distance
The frame's rigging summary: pieces, box corners, couplers, clamps and each structure with its fixtures.
Copy summary copies it as text to paste into an email or a document.
15 · Sharing
Export and share
The PDF documents what's on screen; the Needs Excel is the project's equipment list.
PDF
In View Planos, leave visible the layers you want to document: Fixtures, Signal, Power, Rigging.
Press PDF in the bottom bar. The plan frames itself, whatever your zoom.
Page
Content
1
The plan with its title block: show, date and time, the console's IP (or «N PLOT Designer»), number of fixtures and scale
Datasheet
Fixtures: live values (dimmer, CCT, RGB, crossfade, G/M) and a pixel map for pixel fixtures; recce equipment. Signal and Power: equipment and cable runs (Plan and Needs). Rigging: material and structures. Connections, when there are two layers or more
Elevations
One page per softbox, when the Rigging layer is visible
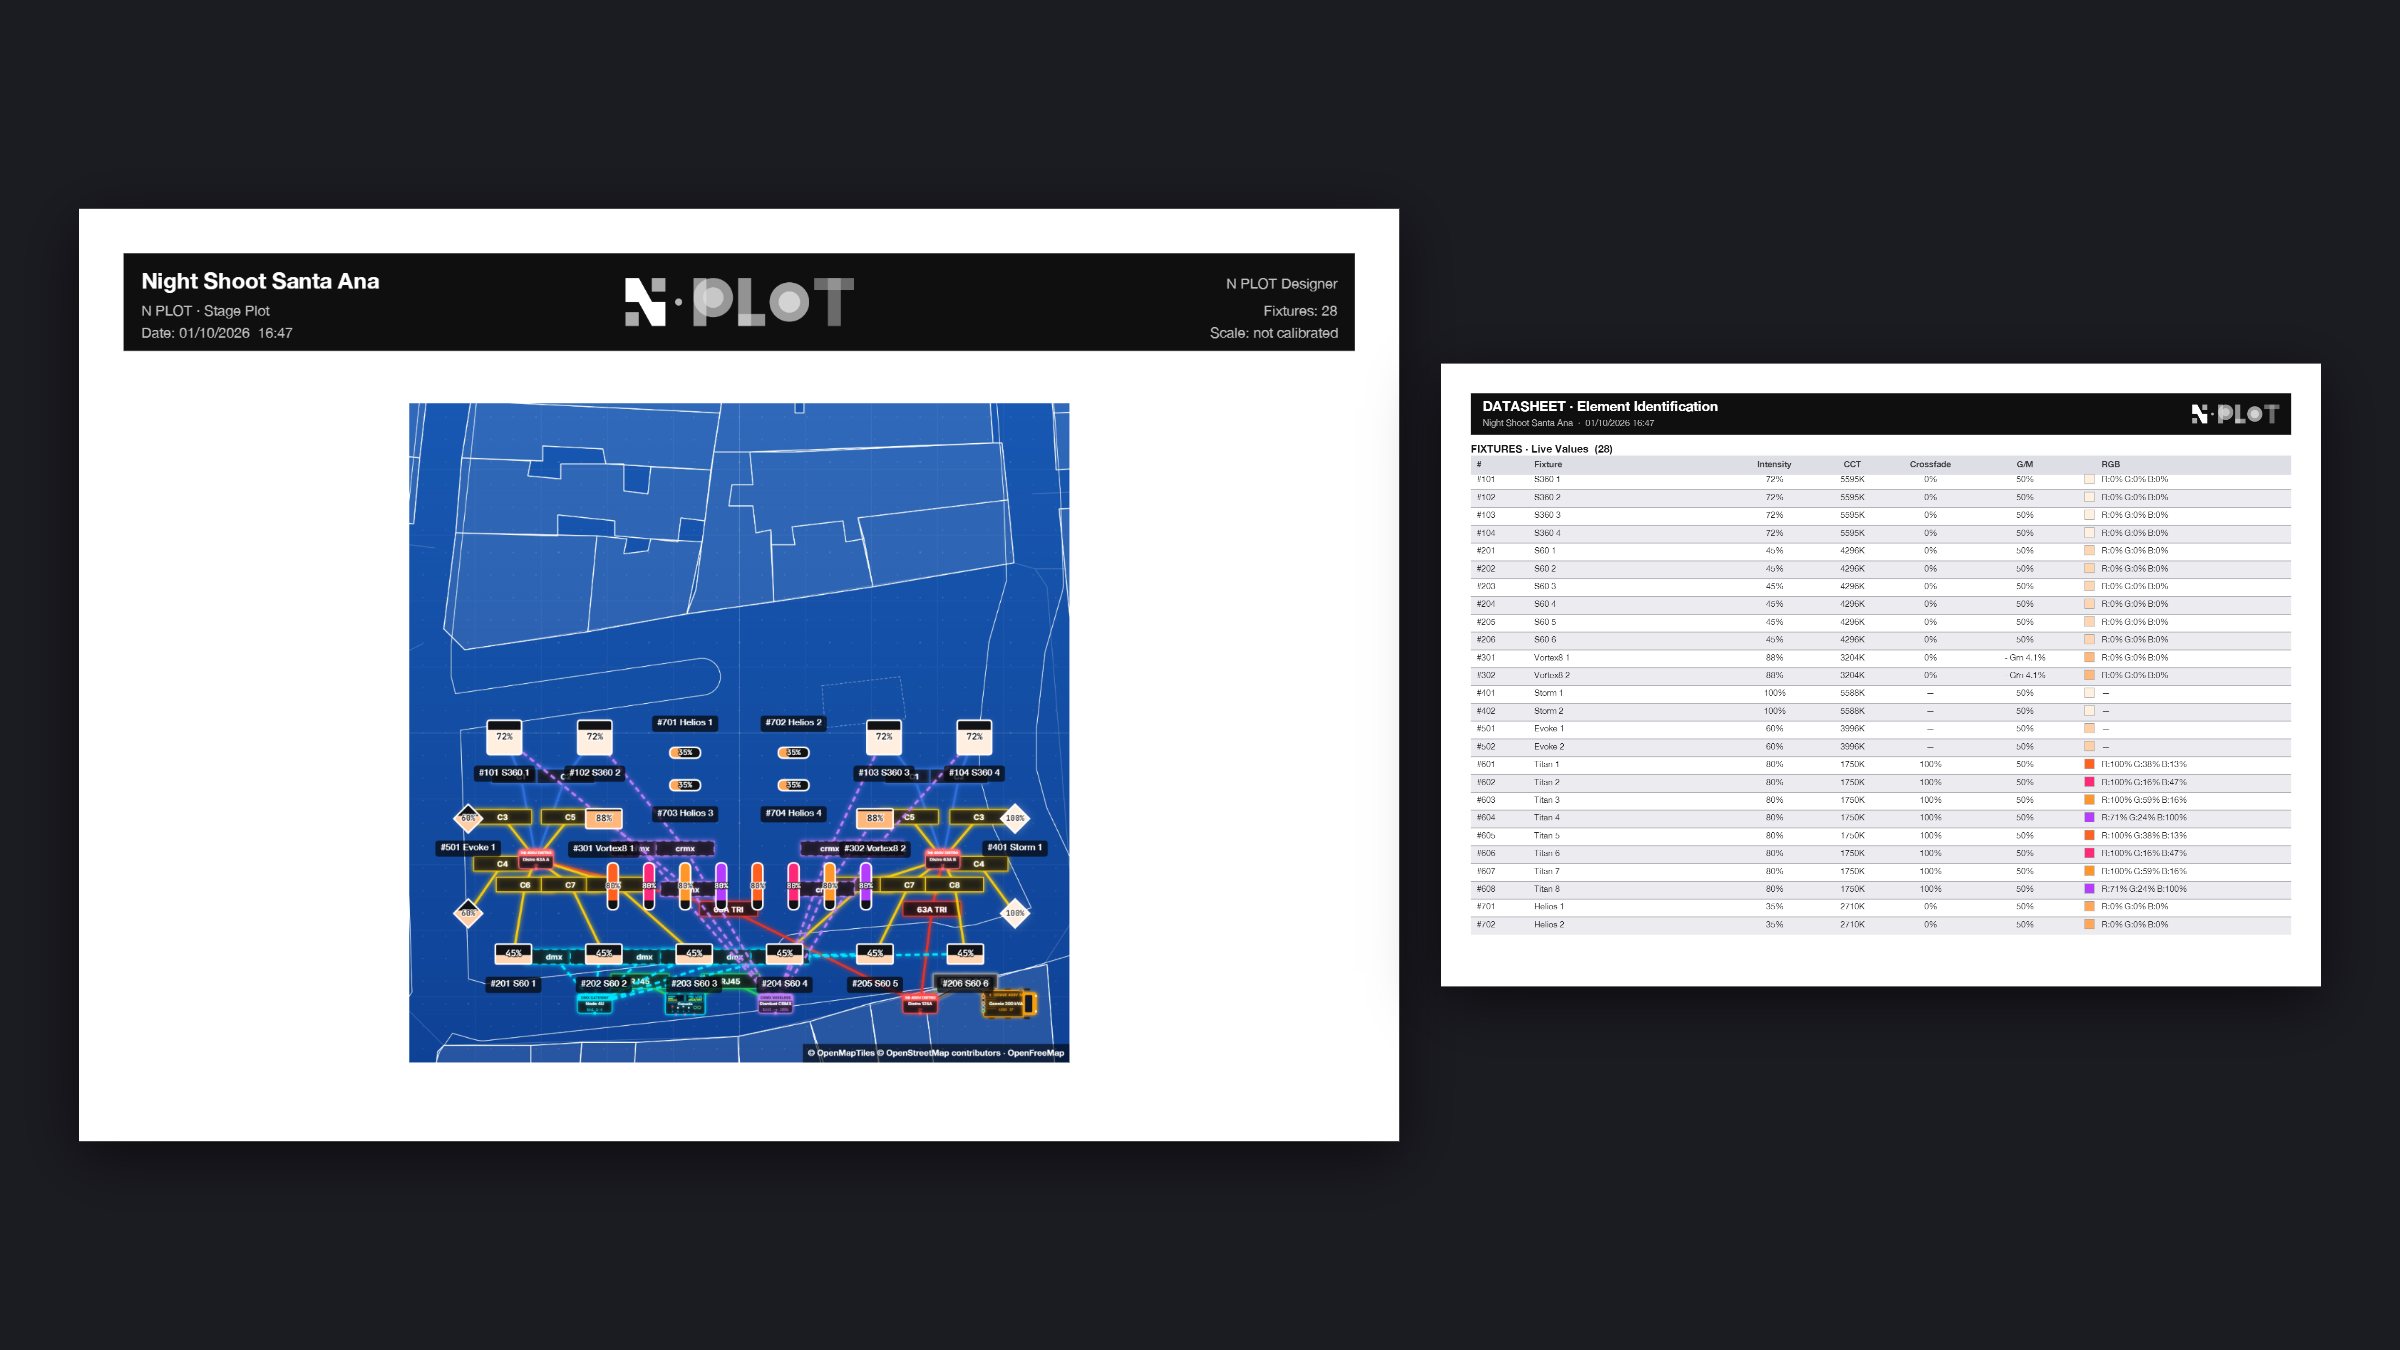
Exported PDF: the plan with its title block and a datasheet with the live values.
With no layers visible, the PDF says so. Each PDF is also archived in the server's reports folder.
Snapshot: an image of the plan as it shows, to send quickly.
Export needs (Excel)
SPR PLOT → Export needs:
Pick which parts go in: Fixtures, Rigging, Power, Signal, Extras, or All.
Pick which planos. Mark Reuses on planos that use the same equipment as others: only what they need on top counts.
Press Export Excel.
The .xlsx has one column per plano, Needed, Extra and Total to order, with live formulas, and blank rows at the end of each section. Extras brings 15 rows for stands, frames, carts, flight cases and consumables. The fixtures it counts are the recce ones (unpatched), by model, with their estimated draw in kW.
Copying and pasting between planos or shows
Select (fixtures, Signal & Power, rigging, shapes, or a mix) and press Ctrl + C.
Switch tab or show and press Ctrl + V. The copy appears offset from the original.
The copy is a new structure, fits the destination plano's scale, and the fixtures copied with it hang again. Pasted fixtures come out unpatched: link them afterwards.
On the iPad, the PDF and the Excel open with the share sheet (Save to Files, AirDrop, Mail…).
16 · Sharing
Teamwork and iPad
One device edits as master and the others on the same network follow its changes instantly, without internet.
Adding a device to the computer's show
On the computer: System Settings → Connect devices. A QR code and the local address appear.
On the iPad or phone, on the same Wi-Fi: scan the QR code or type the address in the browser.
Sign in with your license. Optional: «Add to Home Screen» to use it like an app.
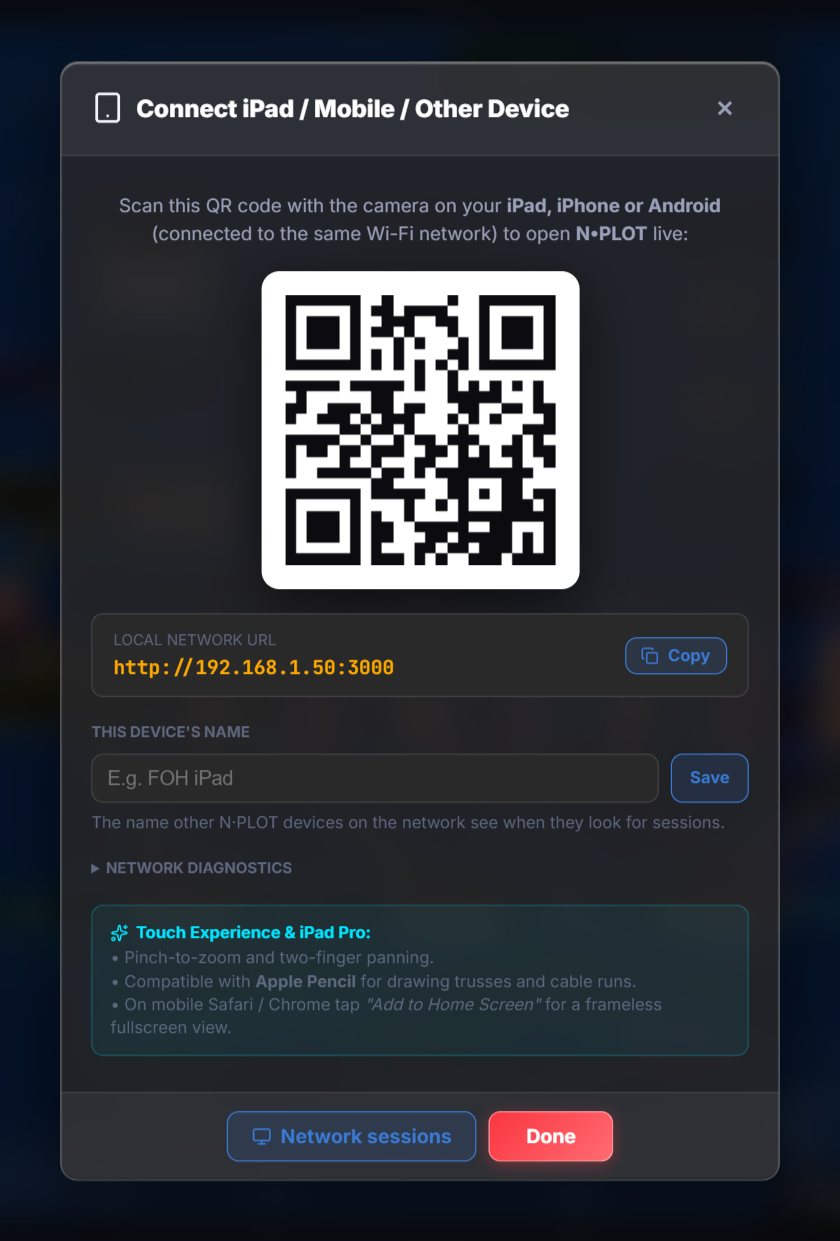
Connecting another device: QR code and local network URL.
iPad app: it carries its own server. When it opens you choose Use this device (it works on its own) or another machine's server. In Settings → Connect devices → Change server the list «N·PLOT on your network» appears (same subnet, masters first). On the computer that list is in Network sessions.
Device name: in Connect devices. It shows in the search and as «Following Juan's iPad».
Master
Button
State
Become master
Nobody is editing: press it to edit yourself
Master (live)
You edit; everything you change reaches the others (fixtures, labels, Signal & Power, rigging, undo…)
Following {name}
Someone else edits; you see it read-only. Press it to take over
While you're master on an iPad the screen stays on: if the app goes to the background, iOS pauses it and the others disconnect. Keep the app in front.
Apple Pencil: it selects, moves and draws with precision.
License: one live session per license; in Team, one per seat. An extra device waits outside, with a notice, until the other one leaves.
17 · Live
DMX patch
The last step. With the plan, signal, power and rigging ready, the patch and the desk bring it to life: every fixture on the plan starts showing what the console sends. On a shoot or an event it's always the last thing you do.
The patch says which channels each fixture reads; it's made by hand or imported from the console, and it's the same for every plano in the show.
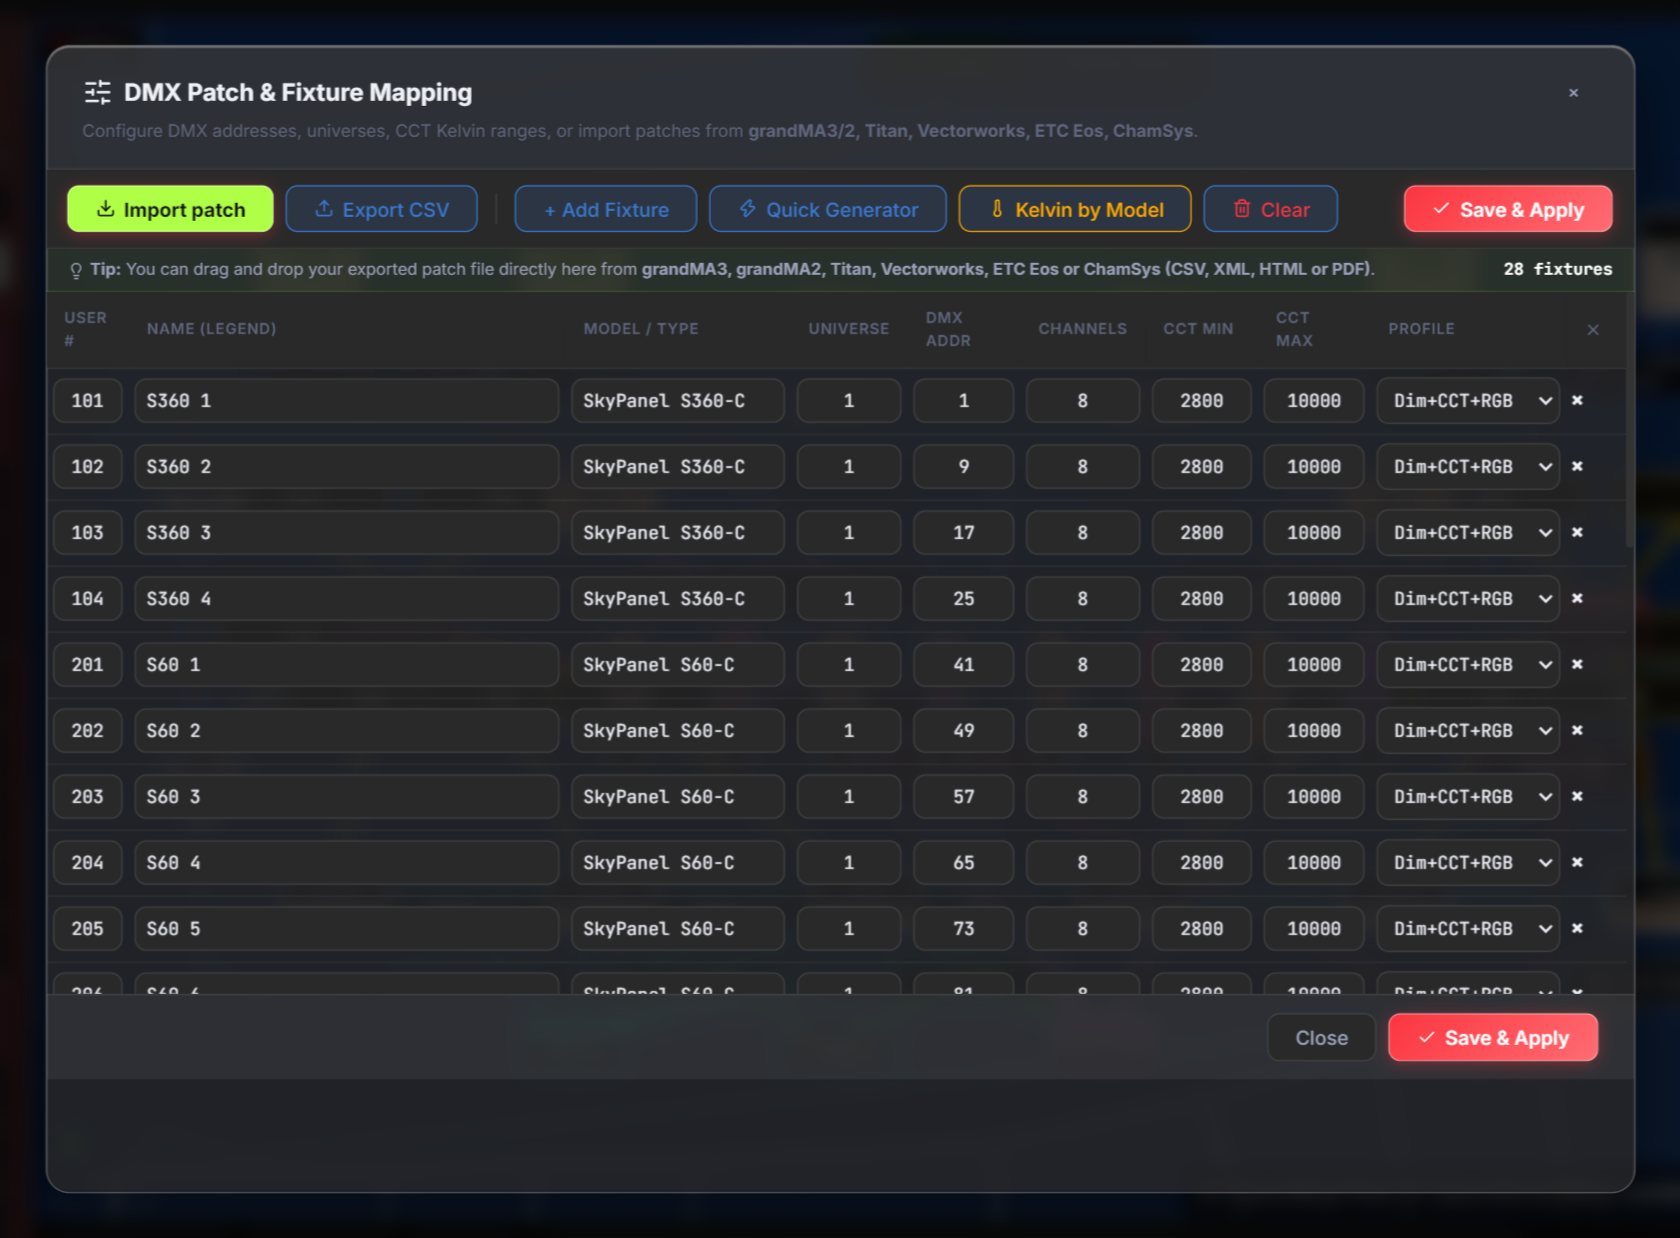
Open the DMX Patch & Fixture Mapping window from System Settings → DMX Patch. Each row is a fixture: User#, name (legend), model and mode, universe, DMX address, channels, minimum and maximum CCT and profile.
DMX Patch: the shoot's 28 fixtures on two universes.
Adding fixtures by hand (+ Add Fixture)
Find the fixture in the library: brand → model → DMX mode.
Set the quantity, first user number, universe and address; by default they carry on where the patch ends.
If the fixture isn't there, press Create generic: pick a template (dimmer, RGB, Dimmer+RGB, RGBW, Dimmer+CCT…), colour order (RGB, RBG, GRB, GBR, BRG, BGR), dimmer position, each channel (attribute, 8 or 16 bits) and the CCT range. Save it to My library to reuse it, or only to this patch.
Quick Generator: creates many at once with a name prefix, first User#, universe, address, channels per fixture, CCT range and profile (Dim+CCT+RGB, Dim+RGB, Dimmer+RGBW, Dimmer only, Dimmer+CCT, RGB only).
Importing the patch from the console or the design
Export the patch from the desk or the software (table below).
Drop it on the window or press Import patch.
Check the rows: the app looks each model and mode up in its library and takes the channels and DMX map from there.
Press Save & Apply.
Source
What to export
Avolites Titan
The patch as HTML, PDF or CSV
grandMA2
The Fixture Layers to a USB stick: gma2\fixture_layers\<name>.xml
grandMA3
Its patch export (CSV or XML)
Vectorworks, ETC Eos, ChamSys
Their patch table as CSV
Anything else
A table with FID, name, type, mode and address headers
Importing replaces the current patch. If you made changes by hand you want to keep, press Export CSV first. Clear empties the whole table: use it with care.
Kelvin by Model: applies a CCT range to every fixture of a model or brand (Astera 1750–20000 K, ARRI SkyPanel 2800–10000 K, Creamsource Vortex, Aputure Storm, bicolour 2700–6500 K). When the app recognises the mode, it uses its library's range.
Colour: besides dimmer, CCT and RGB, the app reads CMY, CTO and colour wheel (it shows the wheel's DMX value).
Linking the recce fixtures
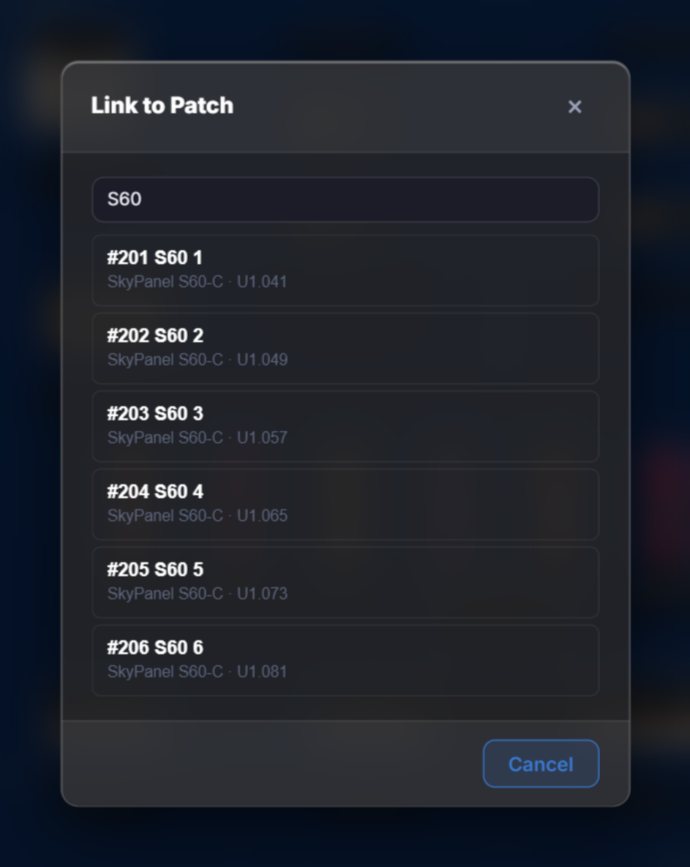
Fixtures placed from the Library are placeholders. Select one and press Link to a patch fixture: it keeps its position, rotation and label and takes the patch's address and name. If the type differs, it takes its shape too. From then on it receives its live values.
Linking a recce fixture to its patch row.
18 · Live
Connecting the console
Live values always arrive over sACN or Art-Net: the desk only has to send its universes to the computer's network. The wizard's native connection adds things such as the show name.
General steps
Put the computer on the console's network (see Before you start).
On the console, turn on sACN or Art-Net output for the show's universes.
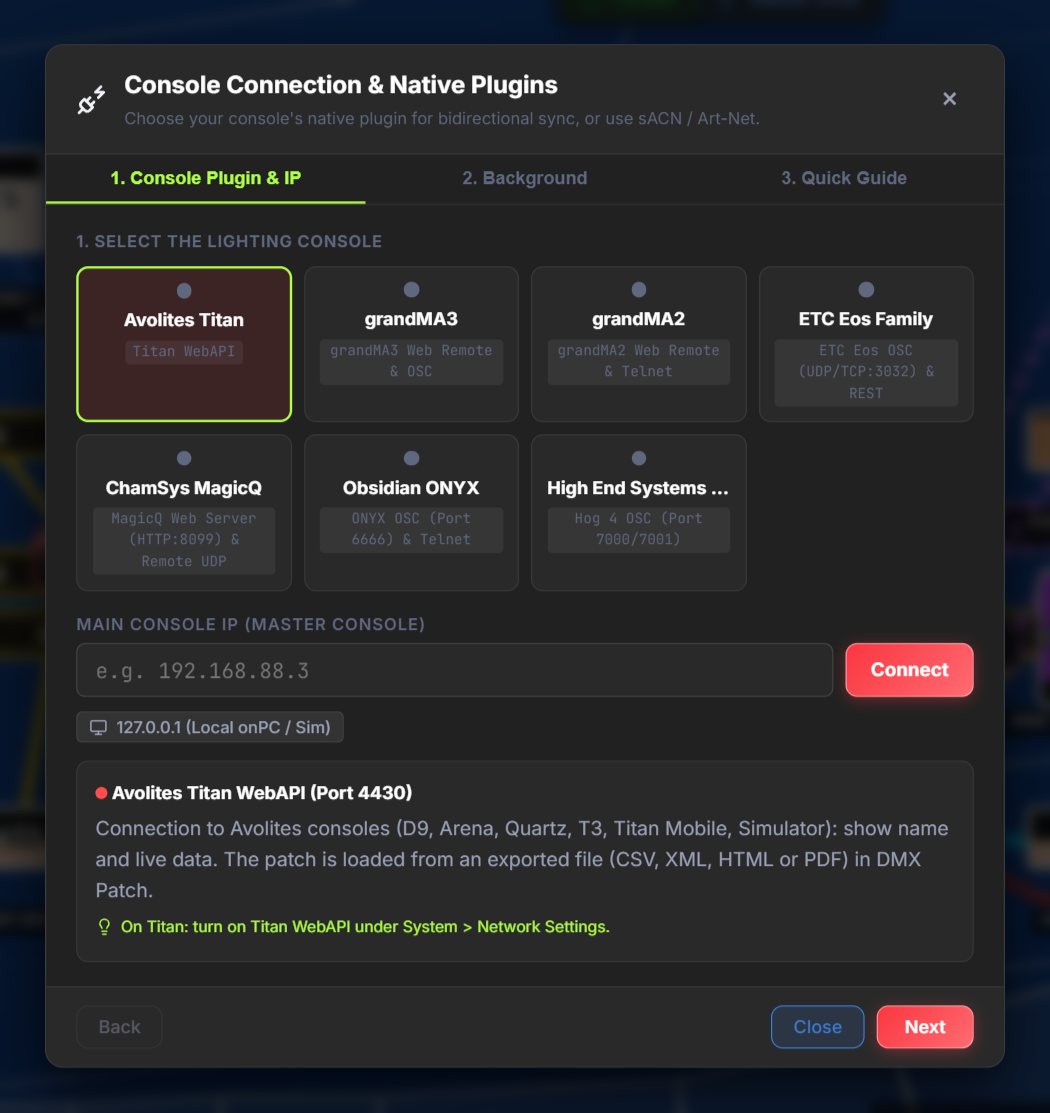
Open the Console Connection & Native Plugins wizard: press the connection status in the top bar, or System Settings → Console IP.
Pick your console in the grid: help appears with the steps to turn its protocol on at the desk.
Type the console's IP and press Connect. Shortcut: 127.0.0.1 for an onPC or simulator on the same computer.
Check the status in the top bar: «sACN Live» or «Art-Net Live».
The connection wizard with Avolites Titan selected.
With sACN there's no IP to type: the app listens to the network's universes as soon as it starts. The IP is for the native connection and to keep other sources out.
By console
Console
Values
Native connection (port)
Patch
Avolites Titan
sACN or Art-Net from the DMX output settings
WebAPI (4430): turn on in System > Network Settings. Shows «Connected to <show> (Titan <version>)»
Import the exported file (the WebAPI doesn't give the DMX mode)
grandMA2
Art-Net in Broadcast or unicast to the computer's IP; nothing to connect
Web Remote (80 / 30000)
Fixture Layers XML; put the mode in the fixture type name
grandMA3
sACN or Art-Net
WebSocket (80): Menu > Network > Web Remote
Import its export
ETC Eos
sACN
OSC (3032)
CSV
ChamSys MagicQ
sACN or Art-Net
HTTP (8099)
CSV
Obsidian ONYX
sACN or Art-Net
OSC (6666)
Generic table
Hog 4
sACN or Art-Net
OSC (7000)
Generic table
Any other
sACN (5568) or Art-Net (6454)
Not needed
Generic table
grandMA2 in detail (tested with an MA.COMPACT.XT 3.9): the XML doesn't carry the mode or the real channels, so the app takes the mode from the fixture type name («Skypanel S60 C P1», «Mode 94», «CCT+RGB 8bit Reduce»…) and looks the model and mode up in its library. Fixtures without an address in the MA2 stay «Unpatched». After importing, check the rows without a mode.
Universes: in sACN universe 1 is 1. In Art-Net, the desk's universe 0 is N·PLOT's universe 1 (0 → 1, 1 → 2…). sACN multicast only arrives on universes 1–16; for more, sACN unicast to the computer's IP, or Art-Net.
States
State
Meaning
sACN Live / Art-Net Live
Real data is arriving from the desk
Demo Mode (blue dot)
No console connected
Reconnecting…
Trying to get the connection back
Disconnected
No connection
You can go back to the wizard any time to change console or reconnect; neither the plan nor the patch is lost.
19 · Live
Live values
With the desk connected and the plan Locked, every patched fixture on the plan is painted with what the console sends.
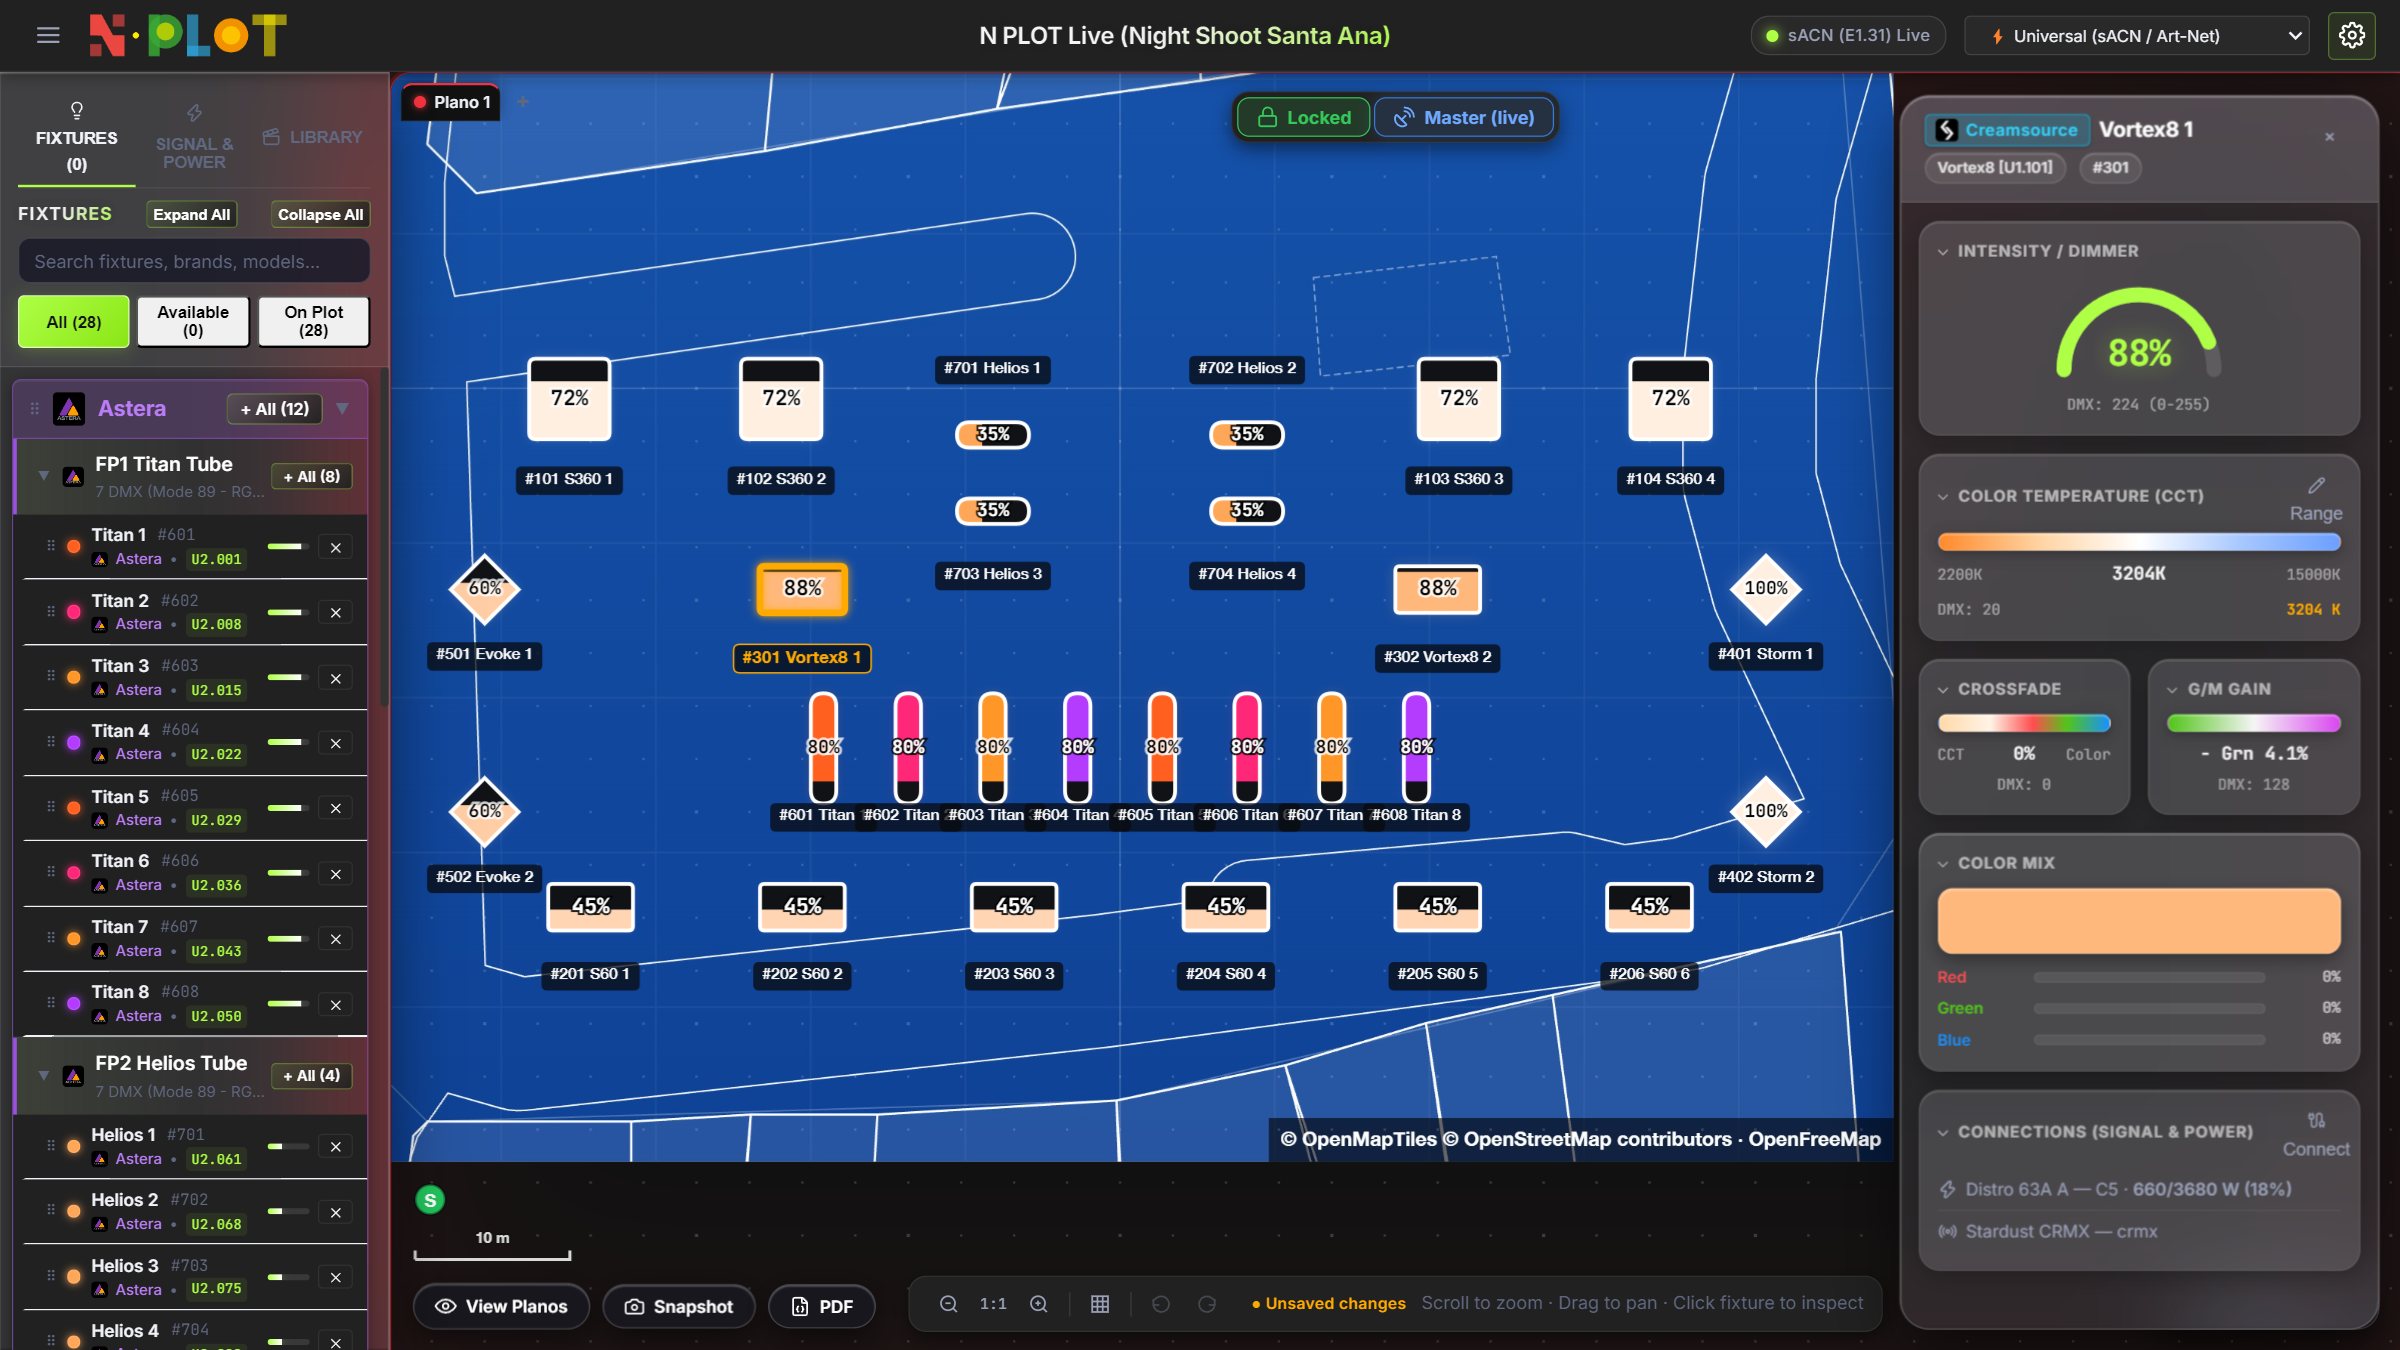
Live: real DMX values on the plan and the selected fixture's panel.
On the plan: the symbol takes the fixture's colour and intensity, with the percentage inside (always horizontal, even when the fixture is rotated). Multi-pixel fixtures paint each pixel. Fixtures hung on a truss turn over and show face up on top of the truss.
The fixture's panel (a tap on it)
Intensity / Dimmer: a meter with the percentage (0–100 %) and the DMX value (0–255).
Color Temperature (CCT): in Kelvin, within the mode's or the patch's range.
RGB and colour mix, when the fixture has it; crossfade and G/M (green/magenta) in the modes that carry them.
Pixels: a mini grid with each one's value.
With several selected, the average («Average Dimmer»).
Show name: with a Titan connected through the WebAPI, the top bar shows the name of the show loaded on the desk. Over sACN the name doesn't arrive: the protocol doesn't carry it.
Several sources on one network: each universe follows a single sender. sACN wins over Art-Net, the highest sACN priority wins, and another sender only takes over after 3 s of silence. That way a fixture getting the same universe from two places doesn't flicker. If you type the console's IP, the app ignores the rest (master console filter).
20 · Help
Common problems
Most problems are about the network or the scale; this table gives the cause and the fix for each.
Problem
Likely cause
Fix
No DMX arrives (Demo Mode)
Computer on another IP range, or with the console's IP
Same network, different IP (console 10.0.0.1, computer 10.0.0.2)
No DMX with Wi-Fi and cable
Two adapters on the same network
Disconnect the one that doesn't go to the console
No DMX on Windows
The firewall blocks the app on that network
Allow N·PLOT on private and public networks
The MA2 shows on the network but sends no values
Art-Net unicast to another IP
Art-Net output in Broadcast
A universe above 16 doesn't arrive
sACN multicast only arrives on 1–16
sACN unicast to the computer's IP, or Art-Net
Everything is one universe off
Art-Net starts at 0
The desk's 0 is N·PLOT's universe 1; check the patch
A fixture flickers
Two sources send the same universe
The app follows one, but turn off the extra one or type the console's IP (master console filter)
A fixture shows the wrong colour or intensity
A different DMX mode from the desk's
Check the mode in the patch; on the MA2, put it in the type name